Blog博客魔改总结(五)
Blog博客魔改总结(五)
Fomalhaut🥝网站恶搞标题
点击查看教程
新建文件
[BlogRoot]\source\js\title.js,写入以下内容:js1
2
3
4
5
6
7
8
9
10
11
12
13
14
15
16
17//动态标题
var OriginTitile = document.title;
var titleTime;
document.addEventListener('visibilitychange', function () {
if (document.hidden) {
//离开当前页面时标签显示内容
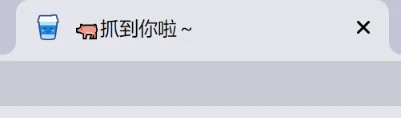
document.title = '👀跑哪里去了~';
clearTimeout(titleTime);
} else {
//返回当前页面时标签显示内容
document.title = '🐖抓到你啦~';
//两秒后变回正常标题
titleTime = setTimeout(function () {
document.title = OriginTitile;
}, 2000);
}
});在主题配置文件
_config.butterfly.yml引入该文件:diff1
2
3inject:
bottom:
+ - <script async src="/js/title.js"></script>重启项目:
bash1
hexo cl; hexo s
导航栏魔改增强版(LYX)
点击查看教程
PS:修复了滚动后显示标题不居中的问题

重构导航栏:修改
[blogRoot]\themes\Butterfly\layout\includes\header\nav.pug,替换成下面的代码,其中图标啥的自己改一下:plaintext1
2
3
4
5
6
7
8
9
10
11
12
13
14
15
16
17
18
19
20
21
22
23
24
25
26
27
28
29
30
31nav#nav
span#blog_name
a#site-name(href=url_for('/')) #[=config.title]
#menus
!=partial('includes/header/menu_item', {}, {cache: true})
//- 这两行是导航栏显示标题用的
center(id="name-container")
a(id="page-name" href="javascript:scrollToTop()") PAGE_NAME
#nav-right
if (theme.algolia_search.enable || theme.local_search.enable)
#search-button
a.search.faa-parent.animated-hover(title="检索站内任何你想要的信息")
svg.faa-tada.icon(style="height:24px;width:24px;fill:currentColor;position:relative;top:6px" aria-hidden="true")
use(xlink:href='#icon-valentine_-search-love-find-heart')
span=' '+_p('search.title')
//- 美化设置
a.meihua.faa-parent.animated-hover(onclick="toggleWinbox()" title="美化设置-自定义你的风格" id="meihua-button")
svg.faa-tada.icon(style="height:26px;width:26px;fill:currentColor;position:relative;top:8px" aria-hidden="true")
use(xlink:href='#icon-tupian1')
//- 暗黑模式按钮
a.sun_moon.faa-parent.animated-hover(onclick='switchNightMode()', title=_p('rightside.night_mode_title') id="nightmode-button")
svg.faa-tada(style="height:25px;width:25px;fill:currentColor;position:relative;top:7px", viewBox='0 0 1024 1024')
use#modeicon(xlink:href='#icon-moon')
#toggle-menu
a
i.fas.fa-bars.fa-fw标题增强:在
custom.css加入如下代码,其中var(--theme-color)替换成你自己的主题色:css1
2
3
4
5
6
7
8
9
10
11
12
13
14
15
16
17
18
19
20
21
22
23
24
25
26
27
28
29
30
31
32
33
34
35/* 标题增强 */
#site-name::before {
opacity: 0;
background-color: var(--theme-color) ;
border-radius: 8px;
-webkit-border-radius: 8px;
-moz-border-radius: 8px;
-ms-border-radius: 8px;
-o-border-radius: 8px;
transition: 0.3s;
-webkit-transition: 0.3s;
-moz-transition: 0.3s;
-ms-transition: 0.3s;
-o-transition: 0.3s;
position: absolute;
top: 0 ;
right: 0 ;
width: 100%;
height: 100%;
content: "\f015";
box-shadow: 0 0 5px var(--theme-color);
font-family: "Font Awesome 6 Free";
text-align: center;
color: white;
line-height: 34px; /*如果有溢出或者垂直不居中的现象微调一下这个参数*/
font-size: 18px; /*根据个人喜好*/
}
#site-name:hover::before {
opacity: 1;
scale: 1.03;
}
#site-name {
position: relative;
font-size: 24px; /*一定要把字体调大点,否则效果惨不忍睹!*/
}顶栏常驻:在
custom.css加入如下代码:css1
2
3
4
5
6
7
8
9
10
11
12
13
14.nav-fixed #nav{
transform: translateY(58px);
-webkit-transform: translateY(58px);
-moz-transform: translateY(58px);
-ms-transform: translateY(58px);
-o-transform: translateY(58px);
}
#nav{
transition: none;
-webkit-transition: none;
-moz-transition: none;
-ms-transition: none;
-o-transition: none;
}显示标题:新建
[BlogRoot]\source\js\nav.js,并写入如下代码:js1
2
3
4
5
6
7
8
9
10
11
12
13
14
15
16
17
18
19
20
21
22
23
24
25
26document.addEventListener('pjax:complete', tonav);
document.addEventListener('DOMContentLoaded', tonav);
//响应pjax
function tonav() {
document.getElementById("name-container").setAttribute("style", "display:none");
var position = $(window).scrollTop();
$(window).scroll(function () {
var scroll = $(window).scrollTop();
if (scroll > position) {
document.getElementById("name-container").setAttribute("style", "");
document.getElementsByClassName("menus_items")[1].setAttribute("style", "display:none!important");
} else {
document.getElementsByClassName("menus_items")[1].setAttribute("style", "");
document.getElementById("name-container").setAttribute("style", "display:none");
}
position = scroll;
});
//修复没有弄右键菜单的童鞋无法回顶部的问题
document.getElementById("page-name").innerText = document.title.split(" | Fomalhaut🥝")[0];
}
function scrollToTop() {
document.getElementsByClassName("menus_items")[1].setAttribute("style", "");
document.getElementById("name-container").setAttribute("style", "display:none");
btf.scrollToDest(0, 500);
}然后还要在
custom.css添加以下css,其中--theme-color换为你自己的主题色:css1
2
3
4
5
6
7
8
9
10
11
12
13
14
15
16
17
18
19
20
21
22
23
24
25
26
27
28
29
30
31
32
33
34
35
36
37
38
39
40
41
42
43
44
45
46
47
48
49
50
51
52
53/* 导航栏显示标题 */
#page-name::before {
font-size: 18px;
position: absolute;
width: 100%;
height: 100%;
border-radius: 8px;
color: white ;
top: 0;
left: 0;
content: "回到顶部";
background-color: var(--theme-color);
transition: all 0.3s;
-webkit-transition: all 0.3s;
-moz-transition: all 0.3s;
-ms-transition: all 0.3s;
-o-transition: all 0.3s;
opacity: 0;
box-shadow: 0 0 3px var(--theme-color);
line-height: 45px; /*如果垂直位置不居中可以微调此值,也可以删了*/
}
#page-name:hover:before {
opacity: 1;
}
#name-container {
transition: all 0.3s;
-webkit-transition: all 0.3s;
-moz-transition: all 0.3s;
-ms-transition: all 0.3s;
-o-transition: all 0.3s;
}
#name-container:hover {
scale: 1.03;
}
#page-name {
position: relative;
padding: 10px 30px; /*如果文字间隔不合理可以微调修改,第二个是水平方向的padding,第一个是垂直的*/
}
#nav{
padding: 0 20px;
}
/* 修复滚动显示标题居中 */
center#name-container {
position: absolute ;
width: fit-content ;
left: 42% ;
}
@media screen and (max-width: 768px) {
center#name-container {
display: none;
}
}重启项目:
bash1
hexo cl; hexo s
配置文件CDN替换
点击查看教程
主题默认的CDN有:local、cdnjs、jsdelivr、unpkg等,但是速度偶读比较一般,要想提高部分标准静态资源的响应速度,走CDN是最好的办法,最好是在国内的CDN。
参考教程:
修改教程,我分享一下我目前在用的方案:
修改主题配置文件_config.butterfly.yml的CDN配置项:
1 | # CDN |
修改完成后可以 f12->源代码->网页 看看是否已经加载到对应的资源
右边滚动栏样式
点击查看教程
在
custom.css中加入以下代码,其中var(--theme-color)换成你自己的主题色:css1
2
3
4
5
6
7
8
9
10
11
12
13
14
15
16
17
18
19
20
21
22
23
24
25
26
27
28
29
30
31
32
33
34/* 滚动条样式 */
::-webkit-scrollbar {
width: 8px;
height: 8px;
}
::-webkit-scrollbar-track {
background-color: rgba(73, 177, 245, 0.2);
border-radius: 2em;
}
::-webkit-scrollbar-thumb {
background-color: var(--theme-color);
background-image: -webkit-linear-gradient(
45deg,
rgba(255, 255, 255, 0.4) 25%,
transparent 25%,
transparent 50%,
rgba(255, 255, 255, 0.4) 50%,
rgba(255, 255, 255, 0.4) 75%,
transparent 75%,
transparent
);
border-radius: 2em;
}
::-webkit-scrollbar-corner {
background-color: transparent;
}
::-moz-selection {
color: #fff;
background-color: var(--theme-color);
}
哔哔部署
点击查看教程
参考教程:
你可以完全按照leonus的来,但是我没有在首页加上轮播的哔哔条,仅仅在哔哔页有,在其基础上又自己加了一些样式,都是些前端的东西,替换掉原来的bb.js
1 | let svg = '<svg viewBox="0 0 512 512" xmlns="http://www.w3.org/2000/svg" class="is-badge"><path d="m512 268c0 17.9-4.3 34.5-12.9 49.7s-20.1 27.1-34.6 35.4c.4 2.7.6 6.9.6 12.6 0 27.1-9.1 50.1-27.1 69.1-18.1 19.1-39.9 28.6-65.4 28.6-11.4 0-22.3-2.1-32.6-6.3-8 16.4-19.5 29.6-34.6 39.7-15 10.2-31.5 15.2-49.4 15.2-18.3 0-34.9-4.9-49.7-14.9-14.9-9.9-26.3-23.2-34.3-40-10.3 4.2-21.1 6.3-32.6 6.3-25.5 0-47.4-9.5-65.7-28.6-18.3-19-27.4-42.1-27.4-69.1 0-3 .4-7.2 1.1-12.6-14.5-8.4-26-20.2-34.6-35.4-8.5-15.2-12.8-31.8-12.8-49.7 0-19 4.8-36.5 14.3-52.3s22.3-27.5 38.3-35.1c-4.2-11.4-6.3-22.9-6.3-34.3 0-27 9.1-50.1 27.4-69.1s40.2-28.6 65.7-28.6c11.4 0 22.3 2.1 32.6 6.3 8-16.4 19.5-29.6 34.6-39.7 15-10.1 31.5-15.2 49.4-15.2s34.4 5.1 49.4 15.1c15 10.1 26.6 23.3 34.6 39.7 10.3-4.2 21.1-6.3 32.6-6.3 25.5 0 47.3 9.5 65.4 28.6s27.1 42.1 27.1 69.1c0 12.6-1.9 24-5.7 34.3 16 7.6 28.8 19.3 38.3 35.1 9.5 15.9 14.3 33.4 14.3 52.4zm-266.9 77.1 105.7-158.3c2.7-4.2 3.5-8.8 2.6-13.7-1-4.9-3.5-8.8-7.7-11.4-4.2-2.7-8.8-3.6-13.7-2.9-5 .8-9 3.2-12 7.4l-93.1 140-42.9-42.8c-3.8-3.8-8.2-5.6-13.1-5.4-5 .2-9.3 2-13.1 5.4-3.4 3.4-5.1 7.7-5.1 12.9 0 5.1 1.7 9.4 5.1 12.9l58.9 58.9 2.9 2.3c3.4 2.3 6.9 3.4 10.3 3.4 6.7-.1 11.8-2.9 15.2-8.7z" fill="#1da1f2"></path></svg>' |
然后直接在bb页面的md文件写上如下的样式:
1 | <style> |
朋友圈配置
点击查看教程
参考教程:友链朋友圈

后端部署都是固定的了,请看上面的参考教程。前端部署我比较喜欢Heo的样式,见 友链朋友圈5 - 我的部署历程与主题样式分享
在Heo样式的基础上,重新换了一些CDN以及一些细节微调,看完Heo的教程并配置好前端后,可以将fcircle.md文件的内容覆写为以下形式,记住填上你的API以及error_img:
1 | <style> |
雪花飘落特效
点击查看教程
逛别人的博客看见有款雪花特效挺不错的,和我的冬日主题很搭配,于是就f12过来了。
新建
[BlogRoot]\source\js\snow.js,并写入以下代码,其中雪花的参数是可以自行调节的:js1
2
3
4
5
6
7
8
9
10
11
12
13
14
15
16
17
18
19
20
21
22
23
24
25
26
27
28
29
30
31
32
33
34
35
36
37
38
39
40
41
42
43
44
45
46
47
48
49
50
51
52
53
54
55
56
57
58
59
60
61
62
63
64
65
66
67
68
69
70
71
72
73
74
75
76
77
78
79
80
81
82
83
84
85
86
87
88
89
90
91
92
93
94
95
96
97
98
99
100
101
102
103
104
105if ((navigator.userAgent.match(/(phone|pad|pod|iPhone|iPod|ios|iPad|Android|Mobile|BlackBerry|IEMobile|MQQBrowser|JUC|Fennec|wOSBrowser|BrowserNG|WebOS|Symbian|Windows Phone)/i))) {
// 移动端不显示
} else {
// document.write('<canvas id="snow" style="position:fixed;top:0;left:0;width:100%;height:100%;z-index:-2;pointer-events:none"></canvas>');
window && (() => {
let e = {
flakeCount: 50, // 雪花数目
minDist: 150, // 最小距离
color: "255, 255, 255", // 雪花颜色
size: 1.5, // 雪花大小
speed: .5, // 雪花速度
opacity: .7, // 雪花透明度
stepsize: .5 // 步距
};
const t = window.requestAnimationFrame || window.mozRequestAnimationFrame || window.webkitRequestAnimationFrame || window.msRequestAnimationFrame || function (e) {
window.setTimeout(e, 1e3 / 60)
}
;
window.requestAnimationFrame = t;
const i = document.getElementById("snow"),
n = i.getContext("2d"),
o = e.flakeCount;
let a = -100,
d = -100,
s = [];
i.width = window.innerWidth,
i.height = window.innerHeight;
const h = () => {
n.clearRect(0, 0, i.width, i.height);
const r = e.minDist;
for (let t = 0; t < o; t++) {
let o = s[t];
const h = a,
w = d,
m = o.x,
c = o.y,
p = Math.sqrt((h - m) * (h - m) + (w - c) * (w - c));
if (p < r) {
const e = (h - m) / p,
t = (w - c) / p,
i = r / (p * p) / 2;
o.velX -= i * e,
o.velY -= i * t
} else
o.velX *= .98,
o.velY < o.speed && o.speed - o.velY > .01 && (o.velY += .01 * (o.speed - o.velY)),
o.velX += Math.cos(o.step += .05) * o.stepSize;
n.fillStyle = "rgba(" + e.color + ", " + o.opacity + ")",
o.y += o.velY,
o.x += o.velX,
(o.y >= i.height || o.y <= 0) && l(o),
(o.x >= i.width || o.x <= 0) && l(o),
n.beginPath(),
n.arc(o.x, o.y, o.size, 0, 2 * Math.PI),
n.fill()
}
t(h)
}
, l = e => {
e.x = Math.floor(Math.random() * i.width),
e.y = 0,
e.size = 3 * Math.random() + 2,
e.speed = 1 * Math.random() + .5,
e.velY = e.speed,
e.velX = 0,
e.opacity = .5 * Math.random() + .3
}
;
document.addEventListener("mousemove", (e => {
a = e.clientX,
d = e.clientY
}
)),
window.addEventListener("resize", (() => {
i.width = window.innerWidth,
i.height = window.innerHeight
}
)),
(() => {
for (let t = 0; t < o; t++) {
const t = Math.floor(Math.random() * i.width)
, n = Math.floor(Math.random() * i.height)
, o = 3 * Math.random() + e.size
, a = 1 * Math.random() + e.speed
, d = .5 * Math.random() + e.opacity;
s.push({
speed: a,
velX: 0,
velY: a,
x: t,
y: n,
size: o,
stepSize: Math.random() / 30 * e.stepsize,
step: 0,
angle: 180,
opacity: d
})
}
h()
}
)()
}
)();
}在自定义css文件
custom.css写入如下代码,我这里设置只在白天模式显示,你可以自行设置,这里比较简单,本质就是调节画布的显示参数:css1
2
3
4
5
6
7
8
9
10
11
12
13
14
15
16
17/* 雪花特效 */
[data-theme="light"] #snow{
display: block;
position: fixed;
left: 0;
top: 0;
width: 100%;
height: 100%;
pointer-events: none;
z-index: -2;
}
/* 雪花黑夜模式不显示 */
[data-theme="dark"] #snow{
display: none;
}引入画布元素:在主题配置文件
_config.butterfly.yml文件的引入js文件和一个canvas画布:diff1
2
3
4inject:
bottom:
+ - <canvas id="snow"></canvas> # 雪花画布
+ - <script async src="/js/snow.js"></script> # 雪花特效重启项目即可看到效果,注意:我的设置只在白天模式显示:
bash1
hexo cl; hexo s
导航栏和风天气
点击查看教程
在和风天气插件中创建一个模板,点击生成代码:

创建文件
[BlogRoot]\source\js\weather.js,将生成的代码写入,例如:js1
2
3
4
5
6
7
8
9
10
11
12
13
14
15
16
17
18
19
20
21
22WIDGET = {
"CONFIG": {
"modules": "01234",
"background": "5",
"tmpColor": "FF9900",
"tmpSize": "16",
"cityColor": "CCCCCC",
"citySize": "16",
"aqiColor": "D9D9D9",
"aqiSize": "16",
"weatherIconSize": "24",
"alertIconSize": "18",
"padding": "15px 10px 10px 20px",
"shadow": "0",
"language": "auto",
"borderRadius": "5",
"fixed": "false",
"vertical": "top",
"horizontal": "left",
"key": "...."
}
}在主题配置文件
_config.butterfly.yml的inject的bottom处引入:diff1
2
3
4inject:
bottom:
+ - <script src="https://widget.qweather.net/simple/static/js/he-simple-common.js?v=2.0"></script>
+ - <script src="/js/weather.js"></script>接下来要挂载到导航栏:在
[BlogRoot]\themes\butterfly\layout\includes\header\nav.pug中加入一个元素,这个元素就是用来放天气组件的:diff1
2
3
4nav#nav
span#blog_name
a#site-name(href=url_for('/')) #[=config.title]
+ #he-plugin-simple上述操作可以将天气组件成功展示在导航栏中间,如果想要调整该组件位置到
blog_name旁,可以直接修改weather.js中的padding项(不推荐),当然推荐在nav.pug中添加一个占位组件:diff1
2
3
4
5nav#nav
span#blog_name
a#site-name(href=url_for('/')) #[=config.title]
#he-plugin-simple
+ #none_space然后在
[BlogRoot]\themes\butterfly\source\css\_layout\head.styl中将#blog_name替换为#none_space:diff1
2
3- #blog_name
+ #none_space
flex: 1重启项目即可看到效果:
bash1
hexo cl; hexo s
侧边栏新年倒计时(Leonus)
点击查看教程
参考教程:Leonus:博客新年倒计时卡片
添加侧边栏:新建文件
[BlogRoot]\source\_data\widget.yml,建议查看butterfly官方文档:自定义侧边栏yml1
2
3
4
5
6
7
8
9
10
11
12
13# top: 创建的 widget 会出现在非 sticky 区域(即所有页面都会显示)
# bottom: 创建的 widget 会出现在 sticky 区域(除了文章页都会显示)
top:
- class_name:
id_name: newYear
name:
icon:
order: 1
html: '<div id="newYear-main"><div class="mask"></div>
<p class="title"></p>
<div class="newYear-time"></div>
<p class="today" style="text-align: right;"></p>
</div>'在
custom.css中添加如下代码:css1
2
3
4
5
6
7
8
9
10
11
12
13
14
15
16
17
18
19
20
21
22
23
24
25
26
27
28
29
30
31
32
33
34
35
36
37
38
39
40
41
42
43
44
45
46
47
48
49
50
51
52
53
54
55
56
57
58
59
60
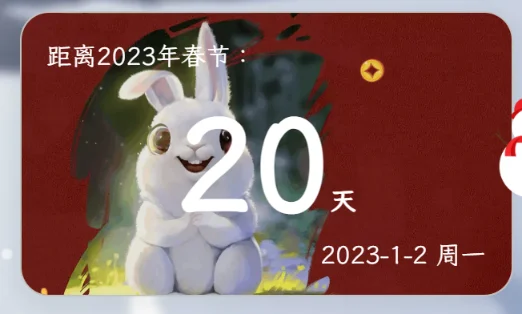
61/* 新年侧边栏 */
#newYear {
color: white;
padding: 0 ;
}
#newYear p,
#newYear h3 {
font-weight: normal;
color: inherit;
margin: 0;
}
#newYear .item-headline {
display: none;
}
#newYear-main {
min-height: 160px;
padding: 1rem;
position: relative;
border-radius: 12px;
background-image: url(https://tuchuang.voooe.cn/images/2023/01/02/tunian.webp);
background-size: cover;
background-position: center;
}
#newYear-main * {
position: relative;
line-height: 1.3;
}
#newYear-main .newYear-time {
font-weight: bold;
text-align: center;
}
#newYear-main .time,
#newYear-main .happyNewYear {
font-size: 3.5rem;
margin: 1rem 0;
display: block;
}
#newYear-main .day {
font-size: 5rem;
}
#newYear-main .day .unit {
font-size: 1rem;
}
#newYear-main .mask {
position: absolute;
left: 0;
top: 0;
height: 100%;
width: 100%;
background-color: rgba(0, 0, 0, .1);
}新建文件
[BlogRoot]\source\js\newYear.js,并写入如下代码,注意最后的Pjax适配,如果没开Pjax直接是newYear()即可,如果是开启了Pjax就用我的即可:js1
2
3
4
5
6
7
8
9
10
11
12
13
14
15
16
17
18
19
20
21
22
23
24
25
26
27
28
29
30
31
32
33
34
35
36
37
38
39
40
41
42
43
44
45
46
47
48
49
50
51
52
53
54
55
56
57
58
59
60
61
62
63
64let newYearTimer = null;
var newYear = () => {
clearTimeout(newYearTimer);
if (!document.querySelector('#newYear')) return;
// 新年时间戳 and 星期对象
let newYear = new Date('2023-01-22 00:00:00').getTime() / 1000,
week = { 0: '周日', 1: '周一', 2: '周二', 3: '周三', 4: '周四', 5: '周五', 6: '周六' }
time();
// 补零函数
function nol(h) { return h > 9 ? h : '0' + h; };
function time() {
// 现在 时间对象
let now = new Date();
// 右下角 今天
document.querySelector('#newYear .today').innerHTML = now.getFullYear() + '-' + (now.getMonth() + 1) + '-' + now.getDate() + ' ' + week[now.getDay()]
// 现在与新年相差秒数
let second = newYear - Math.round(now.getTime() / 1000);
// 小于0则表示已经过年
if (second < 0) {
document.querySelector('#newYear .title').innerHTML = 'Happy New Year!';
document.querySelector('#newYear .newYear-time').innerHTML = '<span class="happyNewYear">新年快乐</p>';
} else {
// 大于0则还未过年
document.querySelector('#newYear .title').innerHTML = '距离2023年春节:'
// 大于一天则直接渲染天数
if (second > 86400) {
document.querySelector('#newYear .newYear-time').innerHTML = `<span class="day">${Math.ceil(second / 86400)}<span class="unit">天</span></span>`
} else {
// 小于一天则使用时分秒计时。
let h = nol(parseInt(second / 3600));
second %= 3600;
let m = nol(parseInt(second / 60));
second %= 60;
let s = nol(second);
document.querySelector('#newYear .newYear-time').innerHTML = `<span class="time">${h}:${m}:${s}</span></span>`;
// 计时
newYearTimer = setTimeout(time, 1000);
}
}
}
// 元宝飘落
jQuery(document).ready(function ($) {
$('#newYear').wpSuperSnow({
flakes: ['https://tuchuang.voooe.cn/images/2023/01/02/yb1.webp', 'https://tuchuang.voooe.cn/images/2023/01/02/yb2.webp', 'https://tuchuang.voooe.cn/images/2023/01/02/yb3.webp'],
totalFlakes: '100',
zIndex: '999999',
maxSize: '30',
maxDuration: '20',
useFlakeTrans: false
});
});
}
// Pjax适配:若没有开启Pjax这里直接是newYear()即可
// 开了Pjax的用以下两句
document.addEventListener('pjax:complete', newYear);
document.addEventListener('DOMContentLoaded', newYear);引入依赖:在主题配置文件
_config.butterfly.yml中添加如下代码:diff1
2
3
4
5inject:
bottom:
+ - <script src="https://cdn.staticfile.org/jquery/3.6.3/jquery.min.js"></script> # jQuery
+ - <script async data-pjax src="https://cdn.wpon.cn/2022-sucai/Gold-ingot.js"></script> # 新年元宝
+ - <script async data-pjax src="/js/newYear.js"></script> # 新年倒计时重启项目:
bash1
hexo cl; hexo s
Twikoo评论系统部署(Vercel方式)
点击查看教程
Twikoo自定义表情与适配
点击查看教程
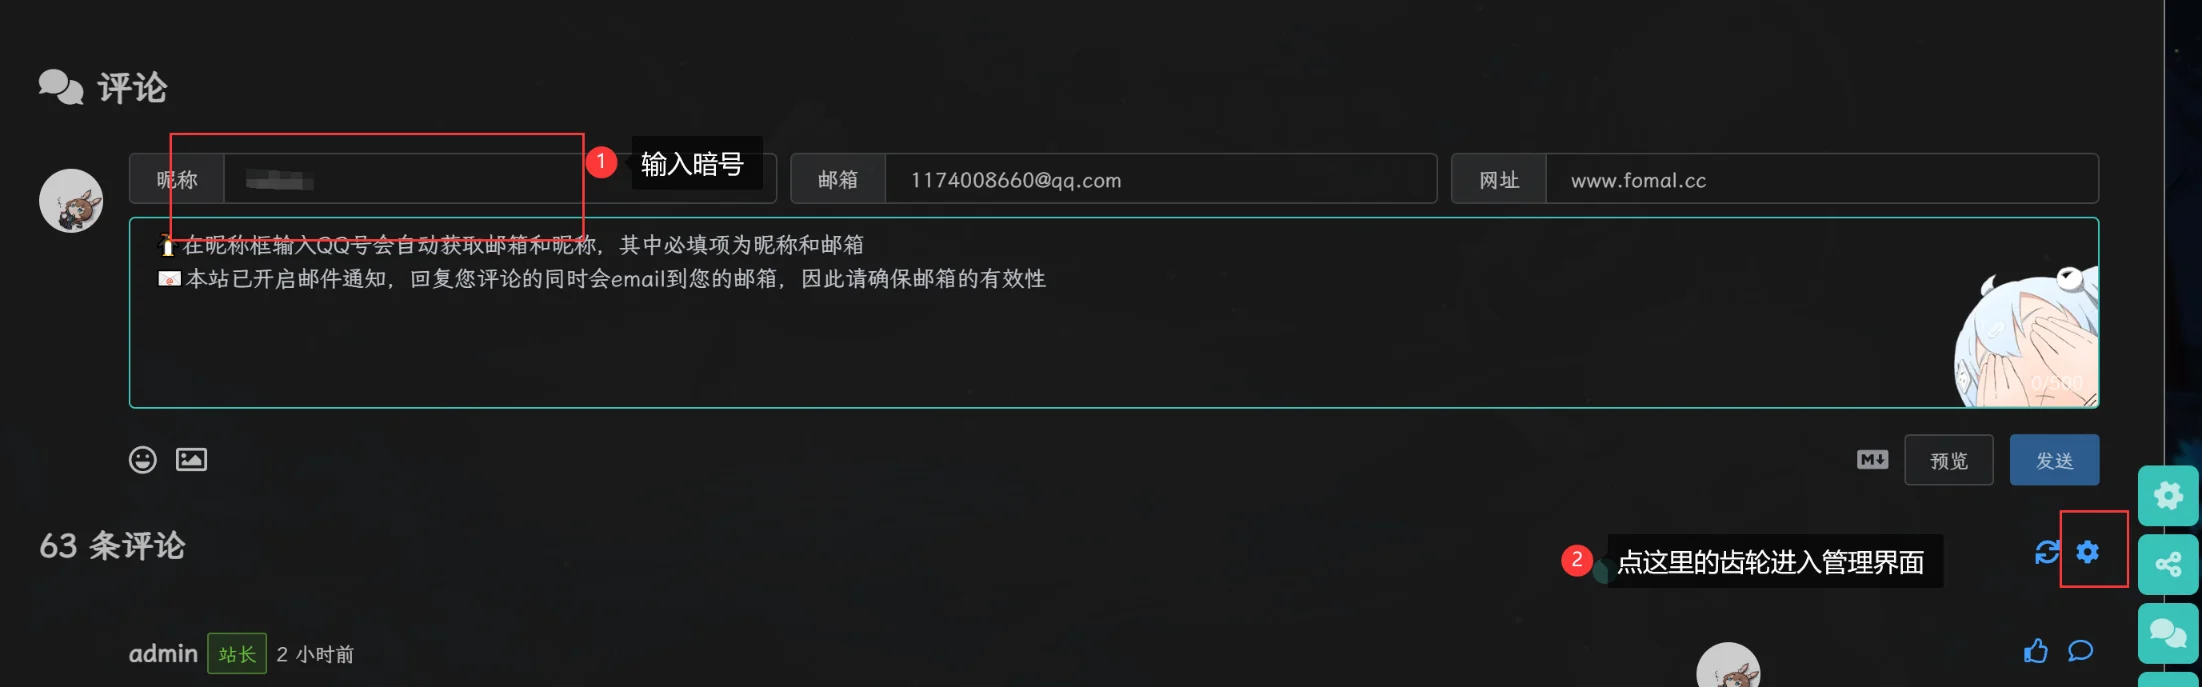
该教程需要你配置完Twikoo评论系统并能进管理界面!
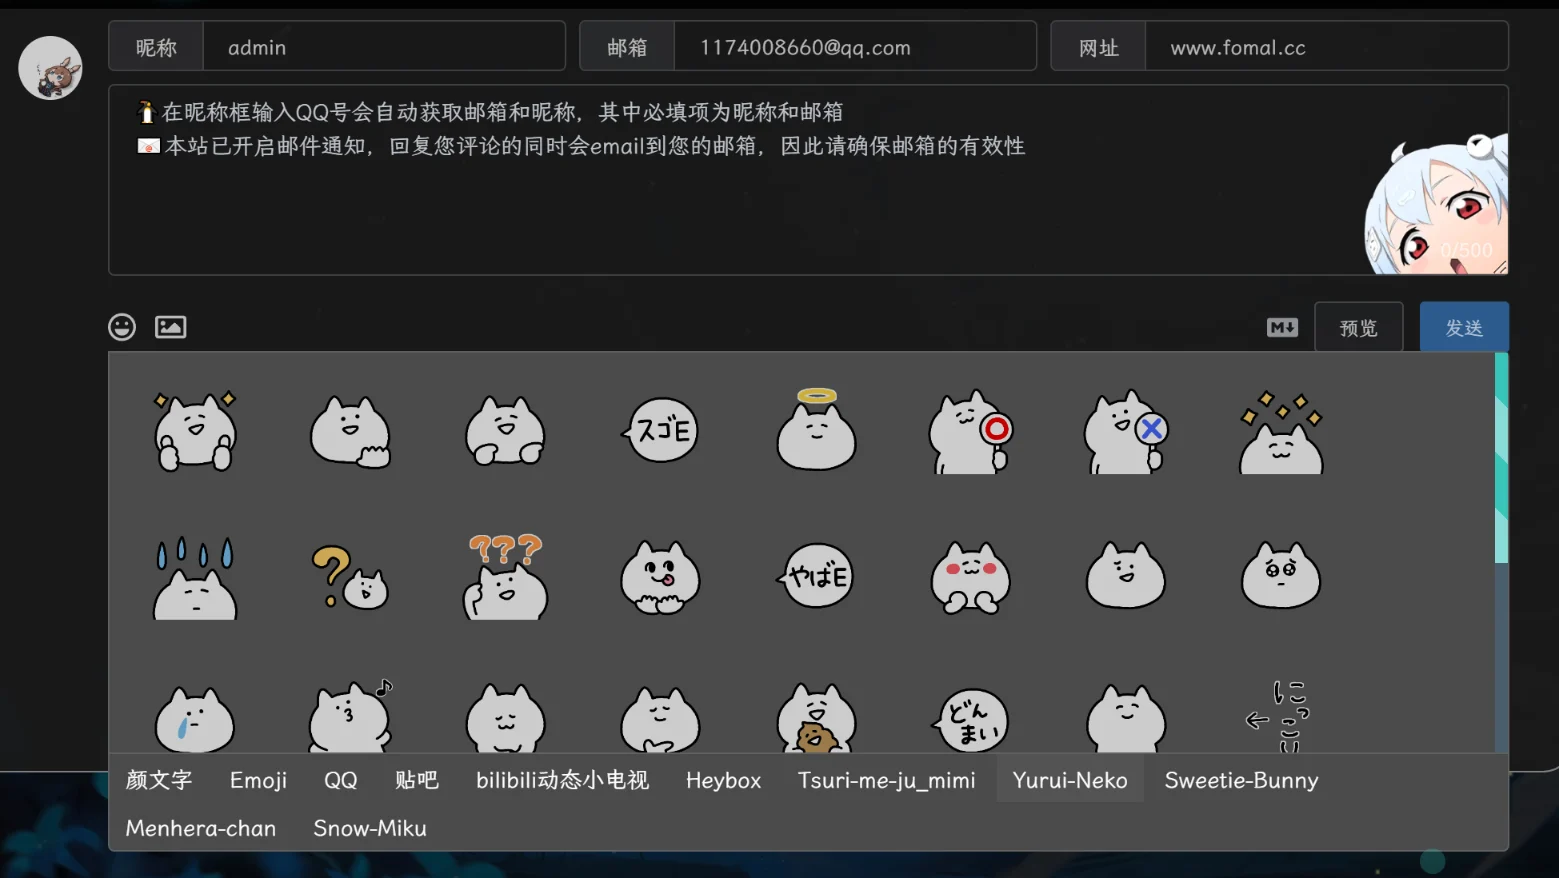
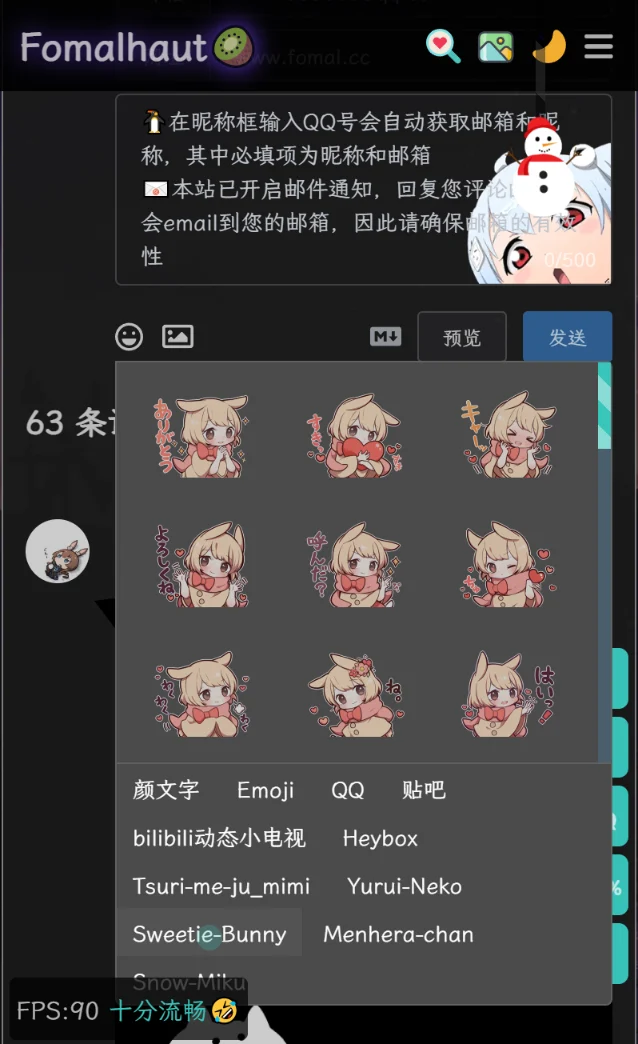
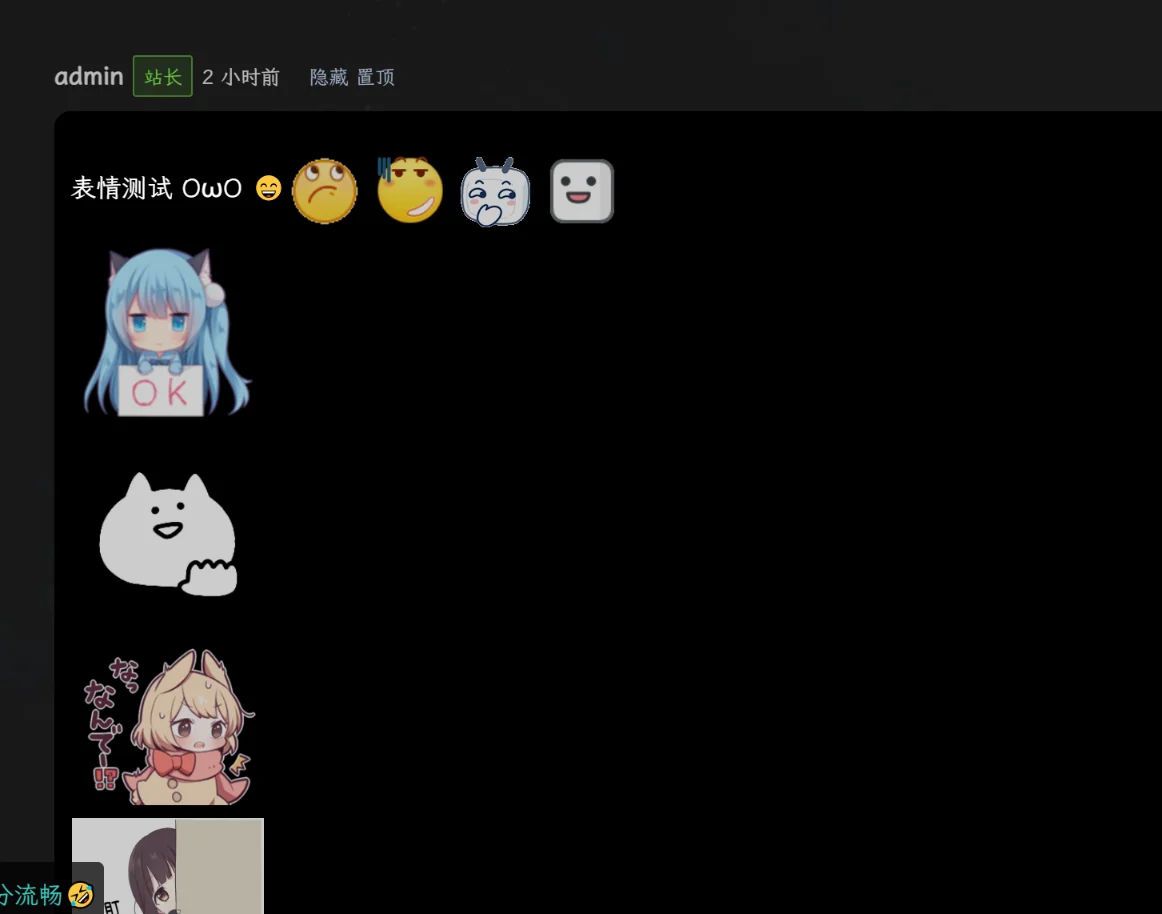
输入暗号进入评论系统管理界面
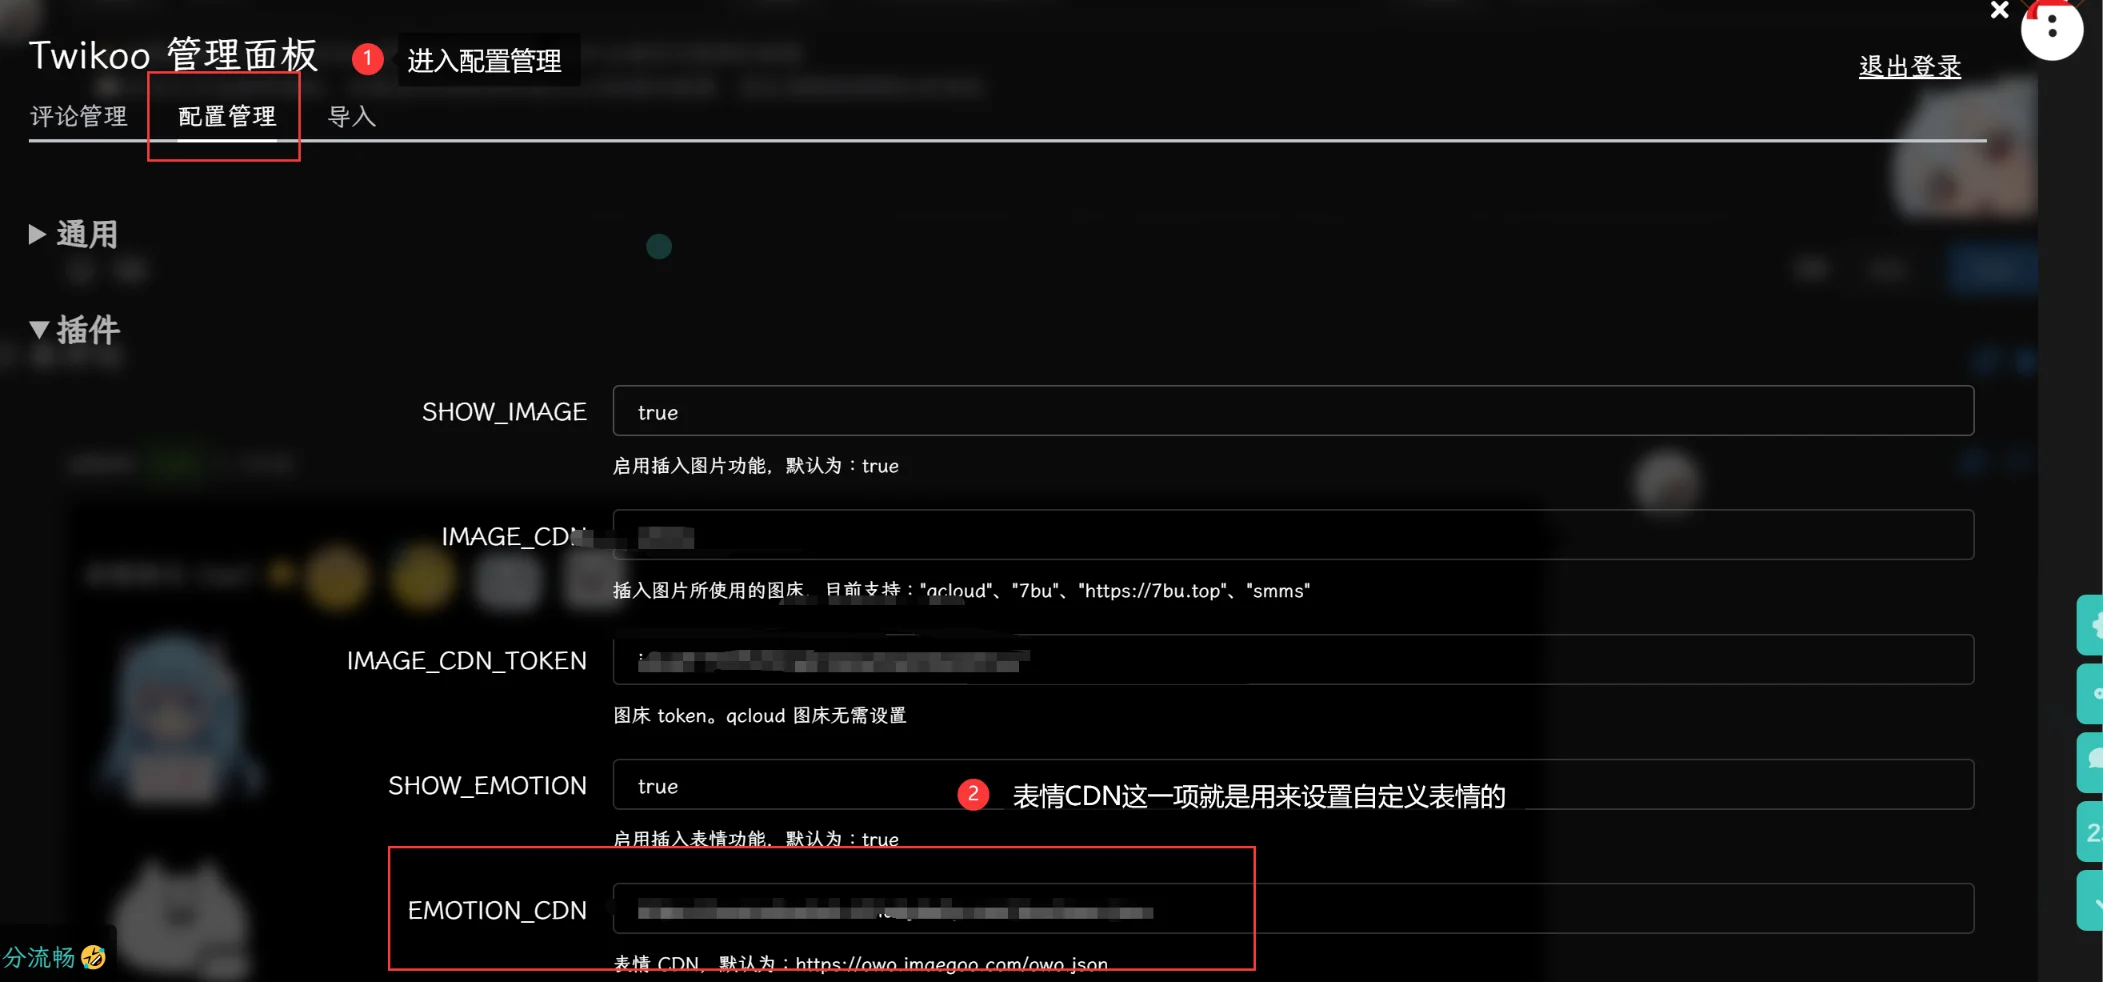
选择
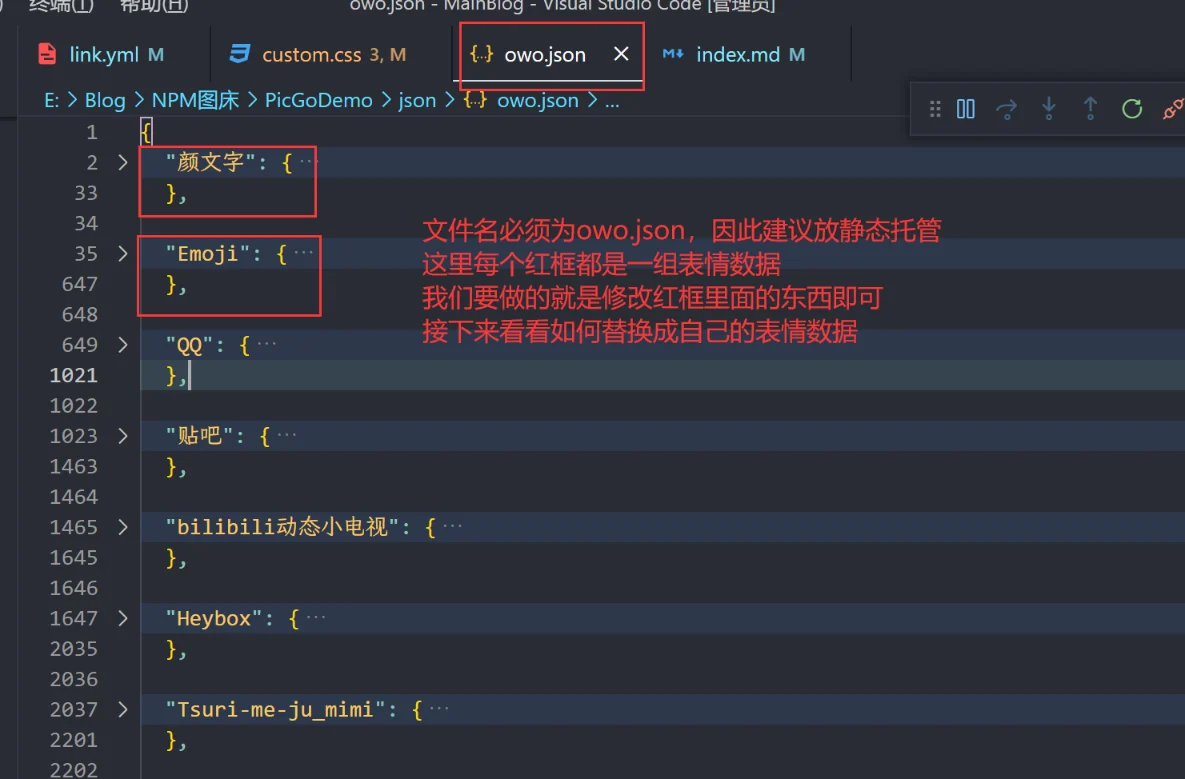
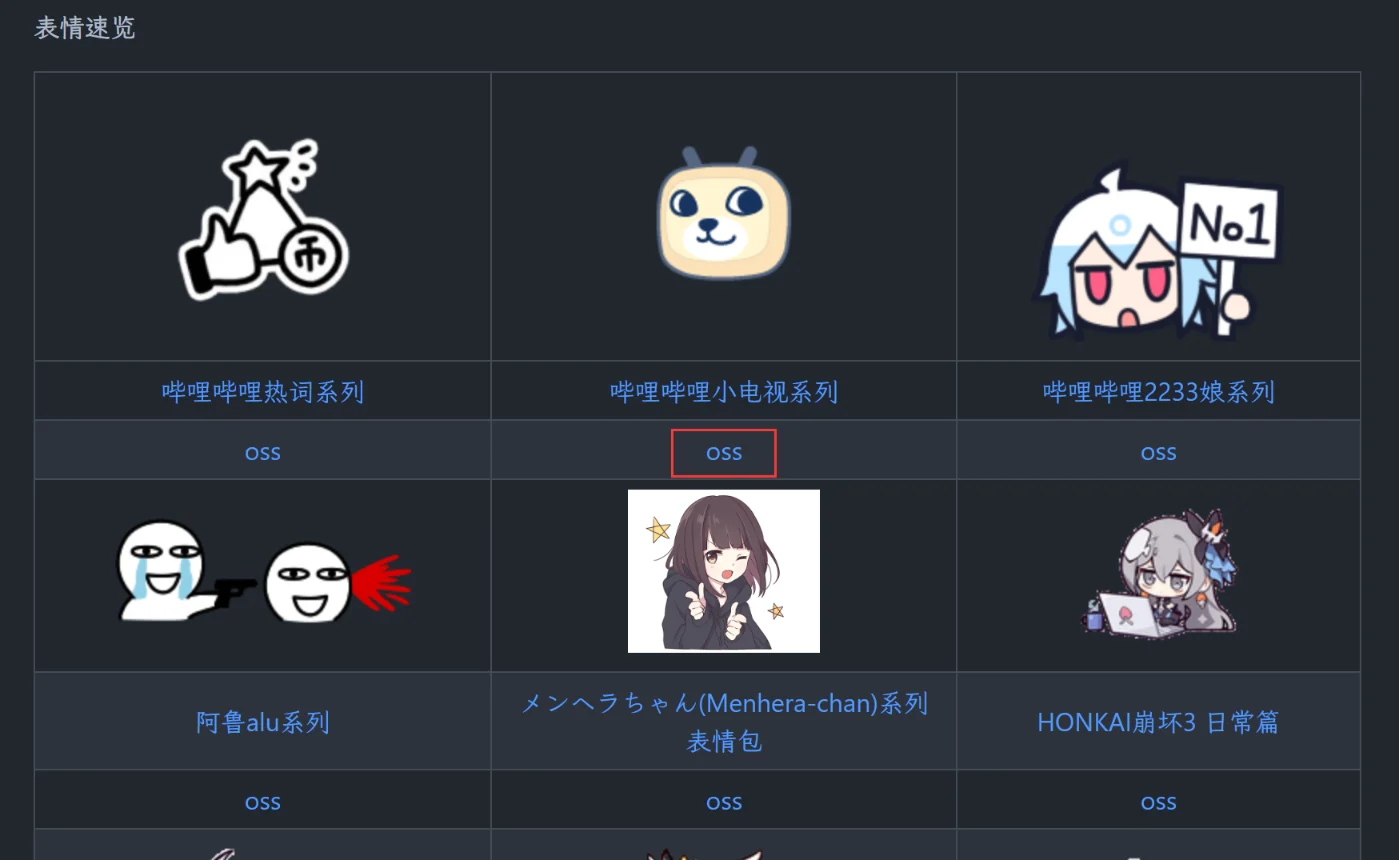
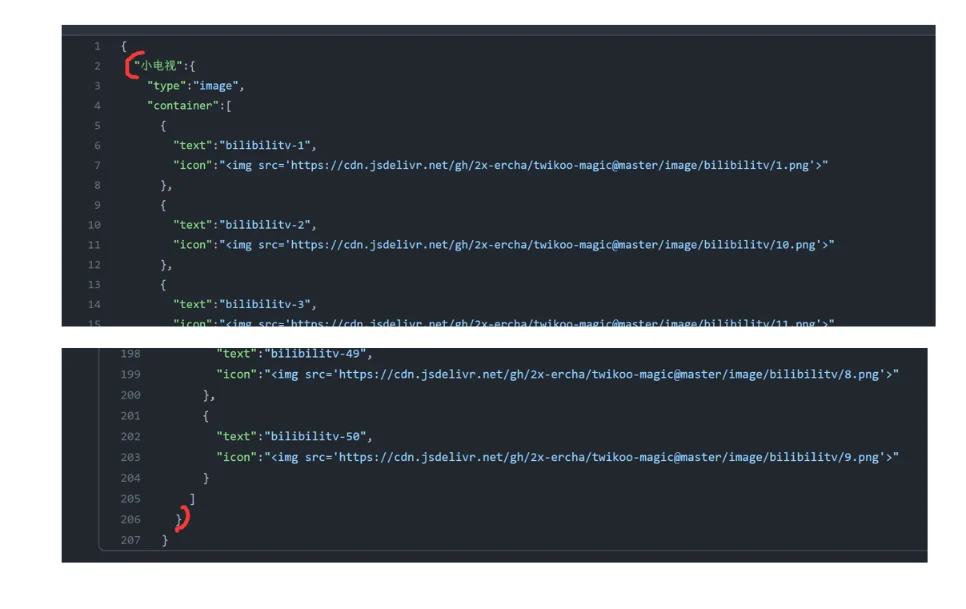
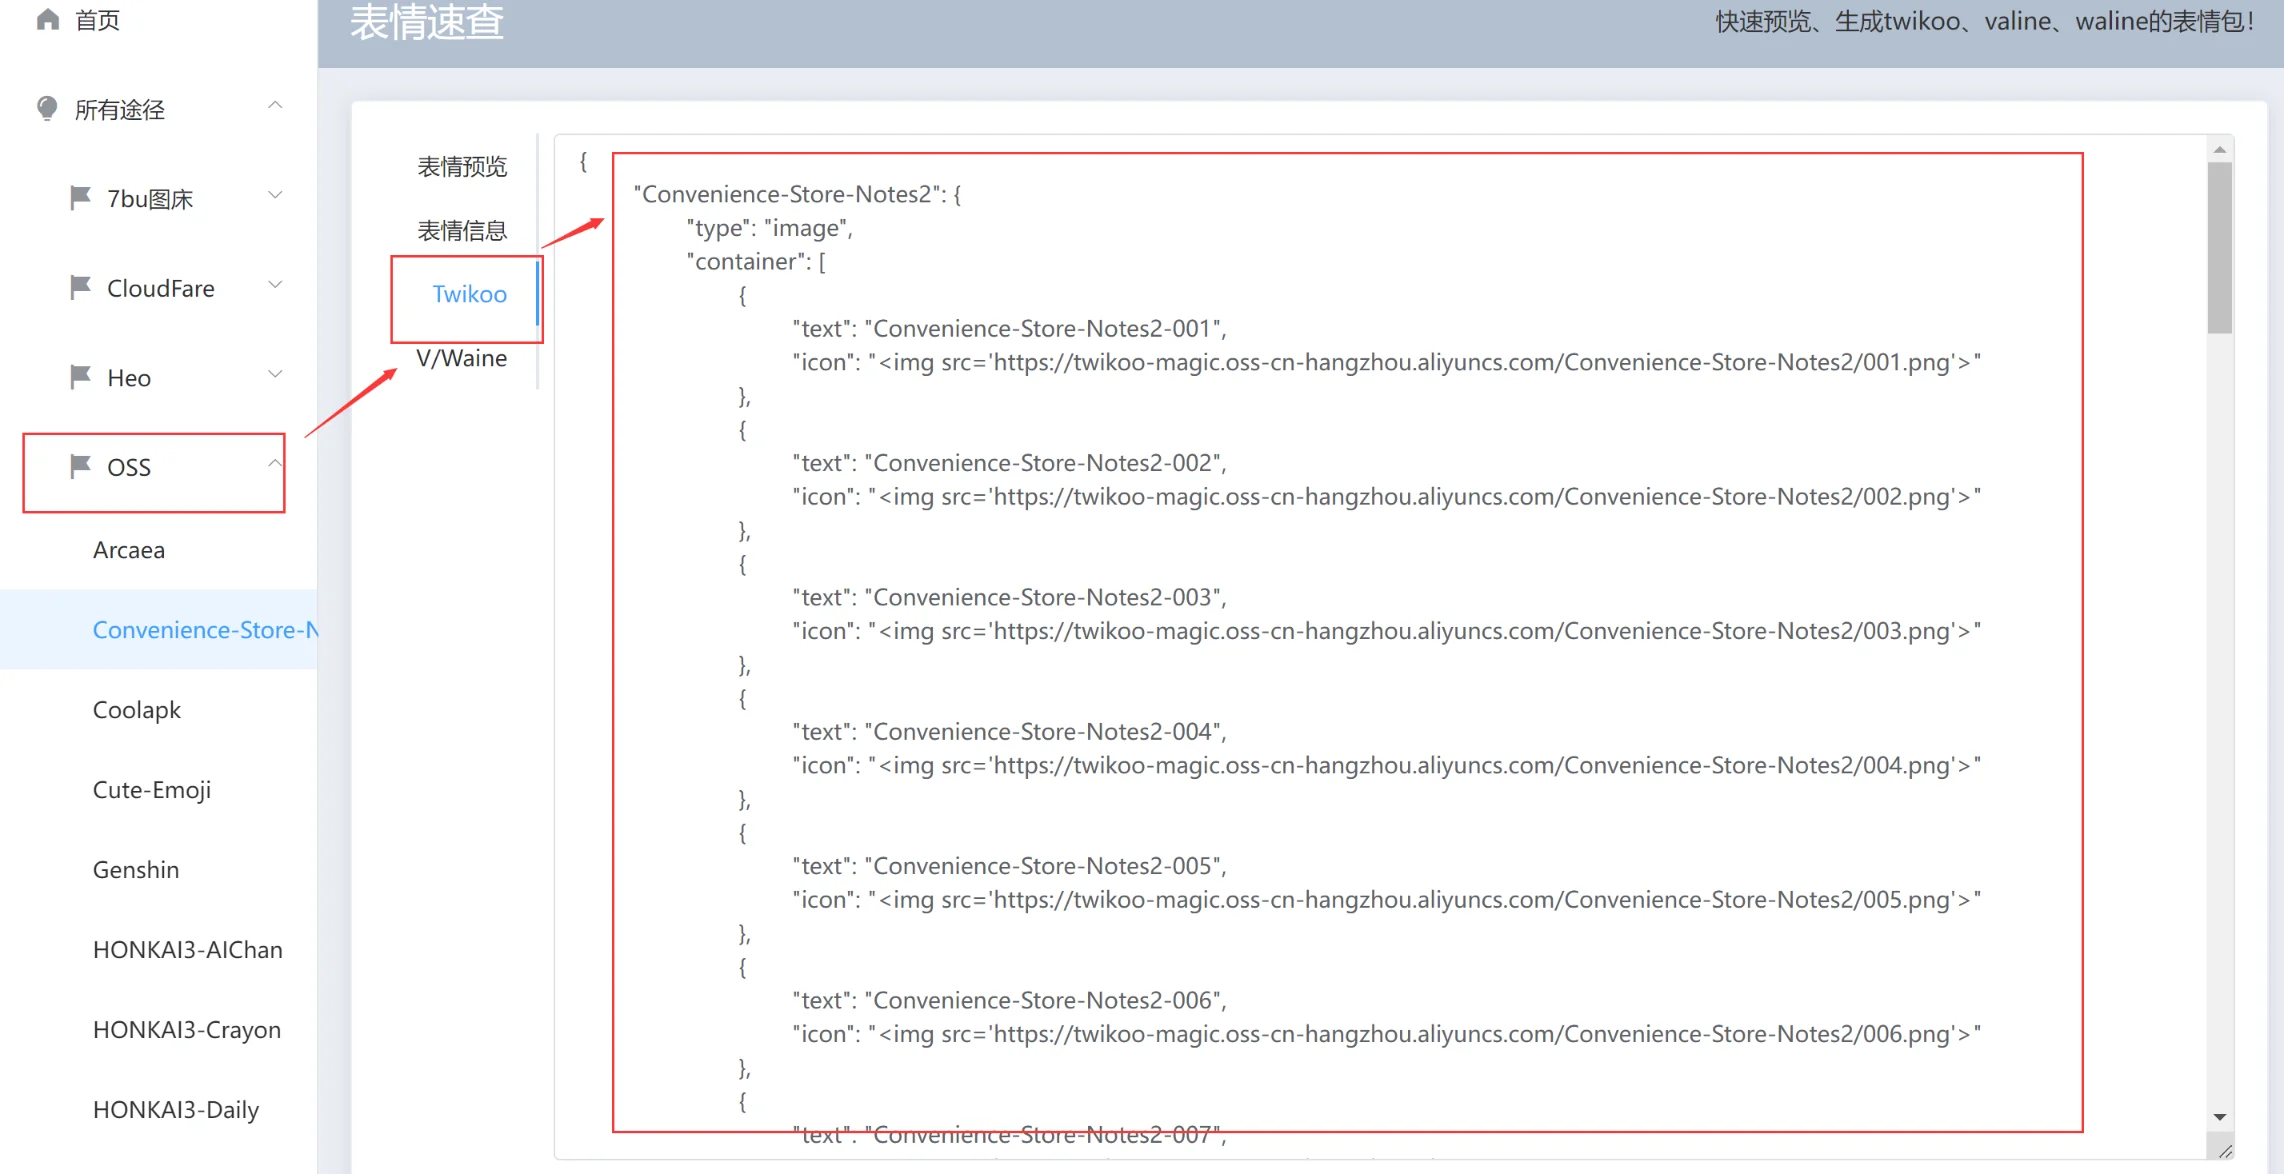
配置管理->插件->EMOTION_CDN,这里就是填自定义表情的json文件,我们看到json文件的结构是一个花括号然后中间填入多组表情数据,我们只需要将中间的的改成我们的表情数据即可:进入Github:Twikoo-Magic或者小康表情速查,按照下图的方法即可获取对应表情的json信息,要复制的信息我已经标记出来,这些就相当于步骤2中的红框信息,替换或者增添上你们喜欢的表情信息即可:
然后将改完的json命名为
owo.json(最好是这个名字),然后托管到静态部署网站,例如对象存储或者Cloudflare这种托管,把对应的文件链接写到EMOTION_CDN,保存后刷新页面即可看到新的表情!如果你不想麻烦或者直接用我的可不可以?当然可以!这里直接贴出我的CDN:
https://source.fomal.cc/json/owo.json,写到EMOTION_CDN即可,到这里就有了表情了,为了让表情显示更加好看,我还做了大小和响应式布局的优化,在custom.css中写入以下代码(注意:该代码仅适用于我的表情数据,你的表情不一定适用!):css1
2
3
4
5
6
7
8
9
10
11
12
13
14
15
16
17
18
19
20
21
22
23
24
25
26
27
28
29
30
31
32
33
34
35
36
37
38
39
40
41
42
43
44
45
46
47
48
49
50
51
52
53
54
55
56
57
58
59
60
61
62
63
64
65
66
67
68
69
70
71
72
73
74
75
76
77
78
79
80
81
82
83
84
85
86
87/* twikoo评论美化 */
/* 自定义twikoo评论输入框高度 */
#twikoo .el-textarea textarea {
min-height: 120px ;
background-size: 90px;
}
/* 自定义表情优化 */
#twikoo .OwO-body {
max-width: 100% ;
}
/* 选择某个框 #twikoo .OwO .OwO-body .OwO-items:nth-child(1) */
#twikoo .OwO .OwO-body .OwO-items {
max-height: 250px ;
}
.OwO .OwO-body .OwO-items-image .OwO-item {
max-width: calc(9% - 10px);
box-sizing: content-box;
}
.OwO .OwO-body .OwO-items-image .OwO-item[title|="Heybox"],
.OwO .OwO-body .OwO-items-image .OwO-item[title|="Tieba"],
.OwO .OwO-body .OwO-items-show .OwO-item[title*="bilibili"] {
max-width: calc(7% - 10px) ;
box-sizing: content-box;
}
#twikoo .OwO-items li img {
width: 100% ;
}
.tk-comment .vemoji[alt|="Menhera"],
.tk-comment .tk-owo-emotion[alt*="Menhera"],
.tk-comment .vemoji[alt|="Snow"],
.tk-comment .tk-owo-emotion[alt*="Snow"],
.tk-comment .vemoji[alt|="Sweetie"],
.tk-comment .tk-owo-emotion[alt*="Sweetie"],
.tk-comment .vemoji[alt|="Tsuri"],
.tk-comment .tk-owo-emotion[alt*="Tsuri"],
.tk-comment .vemoji[alt|="Yurui"],
.tk-comment .tk-owo-emotion[alt*="Yurui"] {
max-width: 120px ;
max-height: 120px ;
width: 120px;
margin: 8px 1px;
display: block ;
}
/* 手机端适配 */
@media screen and (max-width: 768px) {
.tk-comment .vemoji[alt|="Menhera"],
.tk-comment .tk-owo-emotion[alt*="Menhera"],
.tk-comment .vemoji[alt|="Snow"],
.tk-comment .tk-owo-emotion[alt*="Snow"],
.tk-comment .vemoji[alt|="Sweetie"],
.tk-comment .tk-owo-emotion[alt*="Sweetie"],
.tk-comment .vemoji[alt|="Tsuri"],
.tk-comment .tk-owo-emotion[alt*="Tsuri"],
.tk-comment .vemoji[alt|="Yurui"],
.tk-comment .tk-owo-emotion[alt*="Yurui"] {
max-width: calc(100% - 30px) ;
max-height: calc(100% - 30px) ;
}
.OwO .OwO-body .OwO-items-image .OwO-item[title*="Menhera"],
.OwO .OwO-body .OwO-items-image .OwO-item[title*="Snow"],
.OwO .OwO-body .OwO-items-image .OwO-item[title*="Sweetie"],
.OwO .OwO-body .OwO-items-image .OwO-item[title*="Tsuri"],
.OwO .OwO-body .OwO-items-image .OwO-item[title*="Yurui"] {
max-width: calc(33% - 10px);
box-sizing: border-box;
}
.OwO .OwO-body .OwO-items-image .OwO-item[title*="Heybox"],
.OwO .OwO-body .OwO-items-image .OwO-item[title*="bilibili"],
.OwO .OwO-body .OwO-items-image .OwO-item[title*="Tieba"],
.OwO .OwO-body .OwO-items-image .OwO-item[title*="QQ"] {
max-width: calc(18% - 10px) ;
box-sizing: content-box;
}
}
/* 右下角闭眼 */
.el-textarea__inner {
background-image: url(https://tuchuang.voooe.cn/images/2023/01/02/open.webp) ;
}
.el-textarea__inner:focus {
background-image: url(https://tuchuang.voooe.cn/images/2023/01/02/close.webp) ;
}重启项目即可看到效果
css1
hexo cl; hexo s
Twikoo邮件回复模板(绿野仙踪款)
点击查看教程
参考教程:Guole:自定义 Twikoo 访客通知邮件模板
我的邮件模板是基于Guole大佬的模板改的,一些细节改成自己喜欢的样子了
当然你还可以参考Heo的回复模板,也挺好看的:HEO:Twikoo评论回复邮件模板:Acrylic Mail 粉
该模板的使用基于你已经完成Twikoo评论邮件通知!如果还不知道怎么配置邮件通知,参考这篇文章:CSDN:部署Twikoo评论系统及其邮件推送(Vercel)

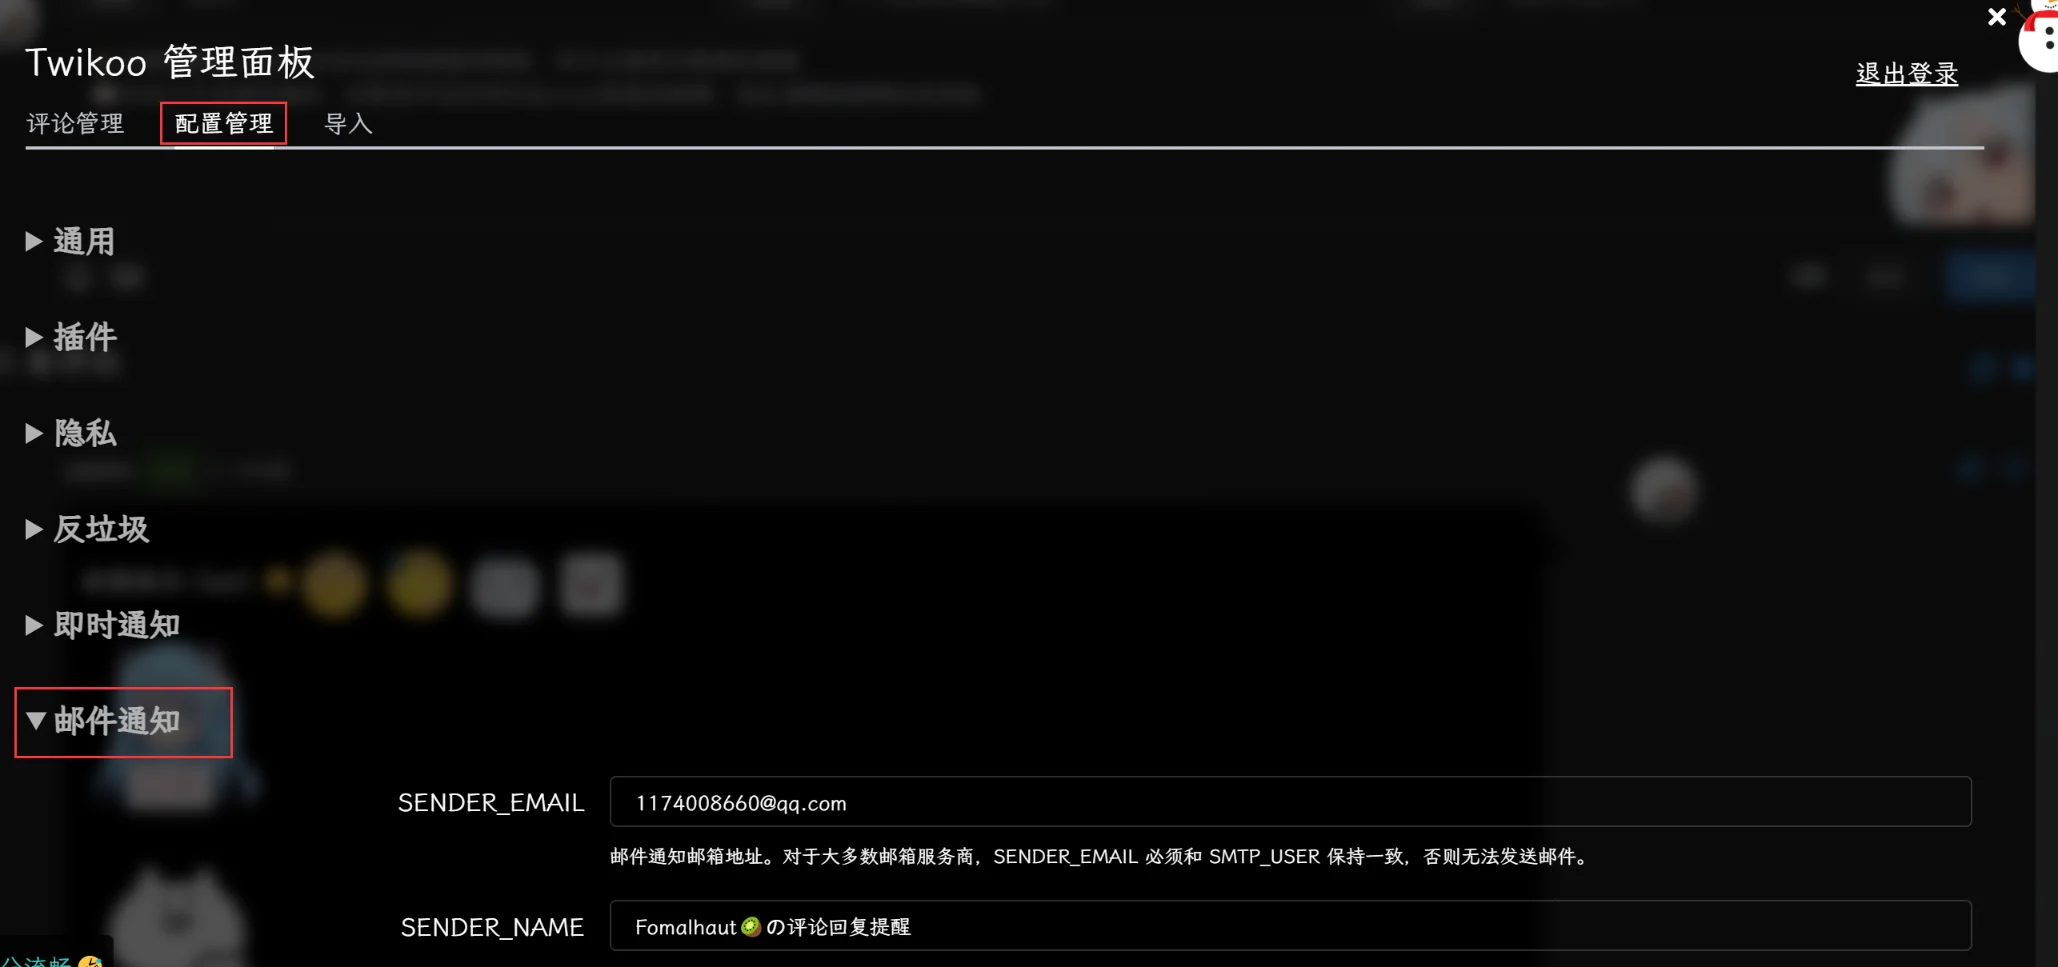
进入Twikoo评论系统的管理界面,
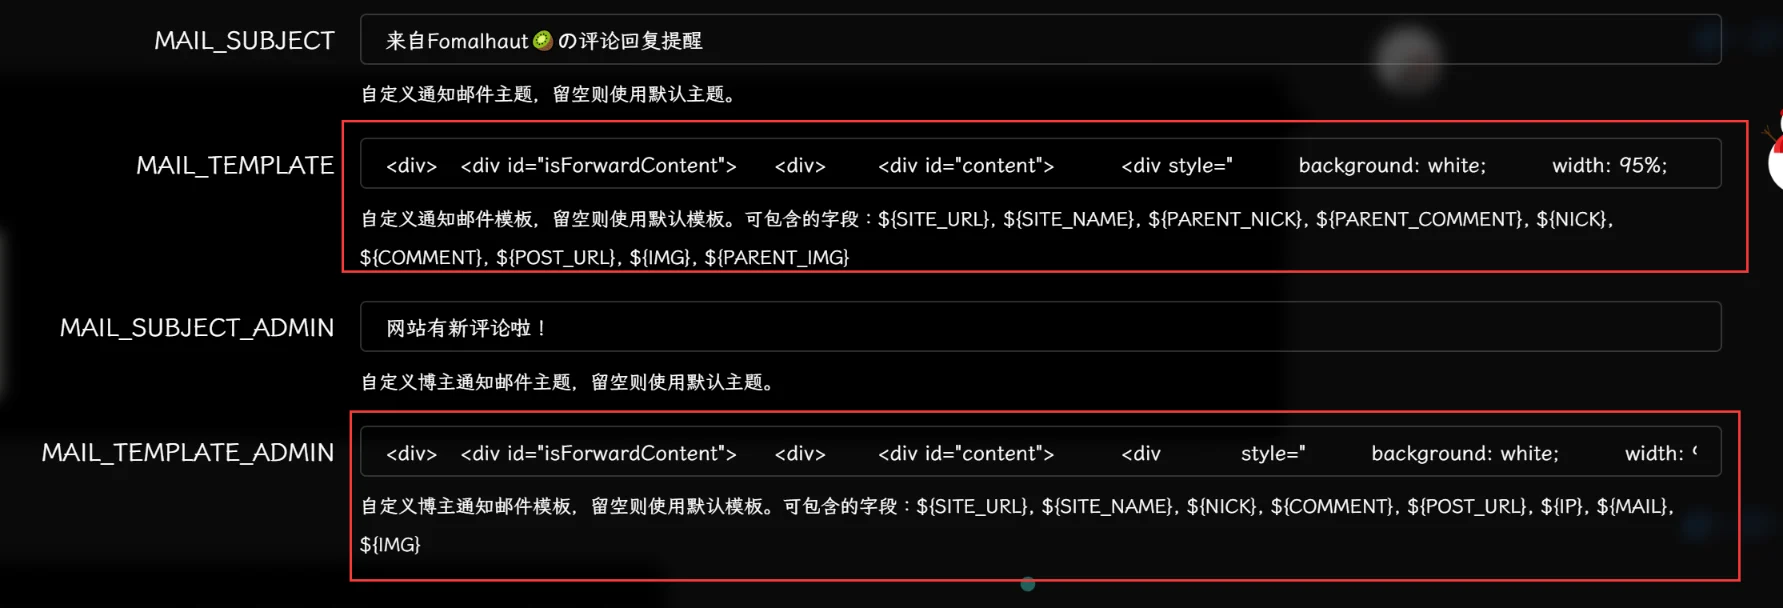
配置管理->邮件通知->MAIL_SUBJECT_ADMIN和MAIL_TEMPLATE_ADMIN,这两个分别是通知博主和通知访客的模板:然后替换成以下代码即可:
html1
2
3
4
5
6
7
8
9
10
11
12
13
14
15
16
17
18
19
20
21
22
23
24
25
26
27
28
29
30
31
32
33
34
35
36
37
38
39
40
41
42
43
44
45
46
47
48
49
50
51
52
53
54
55
56
57
58
59<div>
<div id="isForwardContent">
<div>
<div id="content">
<div style="background: white;width: 95%;max-width: 800px;margin: auto auto; border-radius: 15px; border: #39c5bb 1px solid; overflow: hidden; -webkit-box-shadow: 0px 0px 20px 0px rgba(0, 0, 0, 0.12); box-shadow: 0px 0px 20px 0px rgba(0, 0, 0, 0.18); ">
<header style="overflow: hidden">
<img src="https://tuchuang.voooe.cn/images/2023/01/02/violet.webp" style="width: 100%; z-index: 666" />
</header>
<div style="padding: 5px 20px;background-color: #46e1c60d">
<div class="dear" style=" border-radius: 30px; position: relative; color: white; float: left; z-index: 999; background: #39c5bb; padding: 10px 30px; margin: -25px auto 0; box-shadow: 5px 5px 5px rgba(0, 0, 0, 0.3); ">亲爱的 ${PARENT_NICK} 同学:</div>
<br />
<center>
<h3>来自 <strong>${NICK}</strong> 的回复</h3>
</center>
<hr style="width:200px;border:0;border-bottom:1px solid #e5e5e5;margin:12px auto;" />
<br /><p>您好!您在 <a href="${POST_URL}" style="text-decoration: none; color: #39c5bb" target="_blank"> ${SITE_NAME} </a>上发表的评论:</p>
<div class="tk-content" style="border-radius: 8px;border: 1px solid #ddd; padding-bottom: 20px; background-color: #f5f5f5; margin: 15px 0px; padding-left: 20px; padding-right: 20px; padding-top: 20px;">${PARENT_COMMENT}</div>
<p>
<strong>${NICK}</strong> 给您回复啦:
</p>
<div class="tk-content" style="border-radius: 8px;border: 1px solid #ddd; padding-bottom: 20px; background-color: #f5f5f5; margin: 15px 0px; padding-left: 20px; padding-right: 20px; padding-top: 20px; ">${COMMENT}</div>
<p>欢迎再次光临小站: <a style="text-decoration:none; color:#39c5bb" href="${SITE_URL}" target="_blank">${SITE_NAME}</a>
</p>
<p>(此邮件由Twikoo系统发出,支持直接回复)</p>
<div class="chakan" style="text-align: center;">
<a href="${POST_URL}" style="color:#ffffff;text-decoration:none;display:inline-block;min-height:28px;line-height:28px;padding:0 13px;outline:0;background:#39c5bb;font-size:13px;text-align: center;font-weight:400;border:0;border-radius:999em" target="_blank">点击去原文查看>></a>
<p> </p>
</div>
<div class="footer-p" style="text-align: center; margin-top: 3rem; display:block;color:#b3b3b1;text-decoration:none;">
<img src="https://tuchuang.voooe.cn/images/2023/01/02/avatar.webp" style="width:5rem; margin:0 auto;border-radius: 5px;" />
<hr style="width:165px;border:0;border-bottom:1px solid #e5e5e5;margin:5px auto;" />© 2022-2023 By <a href="https://www.fomal.cc/" style="text-align:center; color: #39c5bb;text-decoration: none;font-weight: bold" target="_blank">Fomalhaut🥝</a>
<p> </p>
</div>
</div>
</div>
</div>
</div>
<br />
</div>
<style type="text/css">
.qmbox ::-webkit-scrollbar { display: none; }
</style>
<style id="cloudAttachStyle" type="text/css">
.qmbox #divNeteaseBigAttach, .qmbox #divNeteaseBigAttach_bak { display: none; }
</style>
<style id="blockquoteStyle" type="text/css">
.qmbox blockquote { display: none; }
</style>
<style type="text/css">
.qmbox body { font-size: 14px; font-family: arial, verdana, sans-serif; line-height: 1.666; padding: 0; margin: 0; overflow: auto; white-space: normal; word-wrap: break-word; min-height: 100px; } .qmbox td, .qmbox input, .qmbox button, .qmbox select, .qmbox body { font-family: Helvetica, 'Microsoft Yahei', verdana; } .qmbox pre { white-space: pre-wrap; white-space: -moz-pre-wrap; white-space: -pre-wrap; white-space: -o-pre-wrap; word-wrap: break-word; width: 95%; } .qmbox th, .qmbox td { font-family: arial, verdana, sans-serif; line-height: 1.666; } .qmbox img { border: 0; } .qmbox header, .qmbox footer, .qmbox section, .qmbox aside, .qmbox article, .qmbox nav, .qmbox hgroup, .qmbox figure, .qmbox figcaption { display: block; } .qmbox blockquote { margin-right: 0px; }
</style>
<style type="text/css">
@media screen and (max-width: 1100px) {#content p {font-size: 10px;} #content h3 {font-size: 14px;} .footer-p {font-size: 9px;} .dear {font-size: 12px;}}
</style>
<style id="ntes_link_color" type="text/css">
.qmbox a, .qmbox td a { color: #236da1; }
</style>
</div>
</div>html1
2
3
4
5
6
7
8
9
10
11
12
13
14
15
16
17
18
19
20
21
22
23
24
25
26
27
28
29
30
31
32
33
34
35
36
37
38
39
40
41
42
43
44
45
46
47
48
49
50
51
52
53
54
55
56<div>
<div id="isForwardContent">
<div>
<div id="content">
<div style="background: white;width: 95%;max-width: 800px;margin: auto auto; border-radius: 15px; border: #39c5bb 1px solid; overflow: hidden; -webkit-box-shadow: 0px 0px 20px 0px rgba(0, 0, 0, 0.12); box-shadow: 0px 0px 20px 0px rgba(0, 0, 0, 0.18); ">
<header style="overflow: hidden">
<img src="https://tuchuang.voooe.cn/images/2023/01/02/violet.webp" style="width: 100%; z-index: 666" />
</header>
<div style="padding: 5px 20px;background-color: #46e1c60d">
<div class="dear" style=" border-radius: 30px; position: relative; color: white; float: left; z-index: 999; background: #39c5bb; padding: 10px 30px; margin: -25px auto 0; box-shadow: 5px 5px 5px rgba(0, 0, 0, 0.3); ">亲爱的猕猴桃站长:</div>
<br />
<center>
<h3>来自 <strong>${NICK}</strong> 的评论</h3>
</center>
<hr style="width:200px;border:0;border-bottom:1px solid #e5e5e5;margin:12px auto;" />
<br>
<p>
您好!系统得知 <strong>${NICK}</strong> 刚刚在您的网站发表评论:
</p>
<div class="tk-content" style="border-radius: 8px;border: 1px solid #ddd; padding-bottom: 20px; background-color: #f5f5f5; margin: 15px 0px; padding-left: 20px; padding-right: 20px; padding-top: 20px; ">${COMMENT}</div>
<p>特地通知您,快去看看吧!</p>
<div class="chakan" style="text-align: center;">
<a href="${POST_URL}" style="color:#ffffff;text-decoration:none;display:inline-block;min-height:28px;line-height:28px;padding:0 13px;outline:0;background:#39c5bb;font-size:13px;text-align: center;font-weight:400;border:0;border-radius:999em" target="_blank">点击去原文查看>></a>
<p> </p>
</div>
<div class="footer-p" style="text-align: center; margin-top: 3rem; display:block;color:#b3b3b1;text-decoration:none;">
<img src="https://tuchuang.voooe.cn/images/2023/01/02/avatar.webp" style="width:5rem; margin:0 auto;border-radius: 5px;" />
<hr style="width:165px;border:0;border-bottom:1px solid #e5e5e5;margin:5px auto;" />© 2022-2023 By <a href="https://www.fomal.cc/" style="text-align:center; color: #39c5bb;text-decoration: none;font-weight: bold" target="_blank">Fomalhaut🥝</a>
<p> </p>
</div>
</div>
</div>
</div>
</div>
<br />
</div>
<style type="text/css">
.qmbox ::-webkit-scrollbar { display: none; }
</style>
<style id="cloudAttachStyle" type="text/css">
.qmbox #divNeteaseBigAttach, .qmbox #divNeteaseBigAttach_bak { display: none; }
</style>
<style id="blockquoteStyle" type="text/css">
.qmbox blockquote { display: none; }
</style>
<style type="text/css">
.qmbox body { font-size: 14px; font-family: arial, verdana, sans-serif; line-height: 1.666; padding: 0; margin: 0; overflow: auto; white-space: normal; word-wrap: break-word; min-height: 100px; } .qmbox td, .qmbox input, .qmbox button, .qmbox select, .qmbox body { font-family: Helvetica, 'Microsoft Yahei', verdana; } .qmbox pre { white-space: pre-wrap; white-space: -moz-pre-wrap; white-space: -pre-wrap; white-space: -o-pre-wrap; word-wrap: break-word; width: 95%; } .qmbox th, .qmbox td { font-family: arial, verdana, sans-serif; line-height: 1.666; } .qmbox img { border: 0; } .qmbox header, .qmbox footer, .qmbox section, .qmbox aside, .qmbox article, .qmbox nav, .qmbox hgroup, .qmbox figure, .qmbox figcaption { display: block; } .qmbox blockquote { margin-right: 0px; }
</style>
<style type="text/css">
@media screen and (max-width: 1100px) {#content p {font-size: 10px;} #content h3 {font-size: 14px;} .footer-p {font-size: 9px;} .dear {font-size: 12px;}}
</style>
<style id="ntes_link_color" type="text/css">
.qmbox a, .qmbox td a { color: #236da1; }
</style>
</div>
</div>这两段代码分别填入步骤1的两个红框当中,一个是站长回复别人评论时别人看到的,另一个是网站有评论通知站长的,里面的信息和样式可以根据自己的实际情况微调,改完了之后可以在这里HTML代码压缩工具进行压缩,然后再复制进去步骤1的两个红框里,保存即可生效!
自定义字段见下表,在生成实际回复邮件时会替换成对应的值:
参数 含义 ${SITE_URL} 网站链接 ${SITE_NAME} 网站名字 ${PARENT_NICK} 被回复人昵称 ${PARENT_COMMENT} 被回复人的评论内容 ${NICK} 回复人昵称 ${COMMENT} 回复人评论内容 ${POST_URL} 文章链接 ${IMG} 回复人头像 ${PARENT_IMG} 被回复人头像 ${MAIL} 回复人邮件 ${MAIL} 回复人 IP 地址 到这步就基本完成了,现在随便用另一个邮箱发表评论测试一下,看看模板是否能正常工作吧!
Hexo博客如何迁移到新电脑
点击查看教程
参考教程:CSDN:Hexo博客迁移到新电脑
在新电脑行进行环境准备工作,具体的步骤和Hexo博客搭建基础教程(一)的第1-7步一模一样,大家在新电脑上跟着做即可(注意千万不要做第8步,
hexo init blog-demo这一步会覆盖并还原你原本的的源码文件)这时候新建一个文件夹
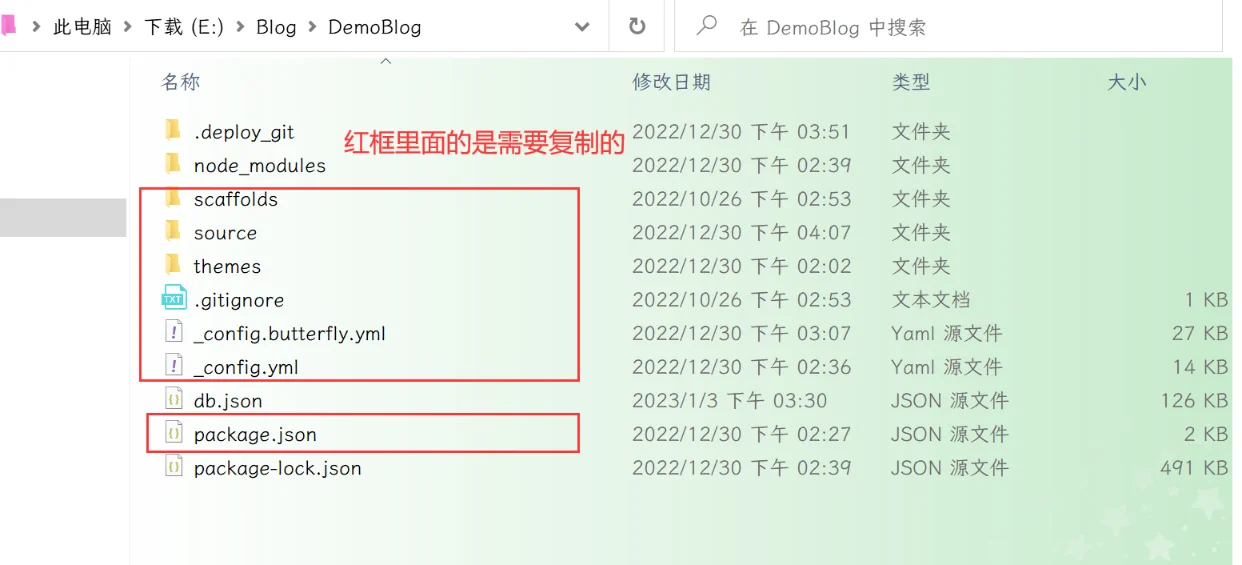
new-blog,用来装你的新博客源码的,进入这个文件夹,准备复制我们旧的博客源码进来,我们可以看到旧的博客项目结构是如下样子的:这里红框内的都是需要复制迁移到新的博客的,具体的要不要保留见下表:
需要复制的 需要删除的 _config.yml:站点配置文件 .git:无论是在站点根目录下,还是主题目录下的.git文件,都可以删掉 _config.butterfly.yml:主题配置文件,为了方便主题升级剥离出来的配置文件 node_modules: npm install会根据package.json生成package.json:说明使用哪些依赖包 public: hexo g会重新编译生成scaffolds:文章的模板 .deploy_git:在使用 hexo d时也会重新生成source:自己写的博客源码 db.json文件: hexo s快速启动所需的数据库themes:主题文件夹(魔改都在里面啦) package-lock.json:记录依赖之间的内部依赖关系,可以根据 package.json重新生成.gitignore:说明在提交时哪些文件可以忽略 复制所需的文件到新电脑的文件夹之后,在
git bash中切换目录到新拷贝的文件夹里,使用npm install命令,进行模块安装。这里绝对不能使用hexo init初始化,因为有的文件我们已经拷贝生成过来了,所以不必用hexo init去整体初始化,如果不慎用了,则站点的配置文件_config.yml里面内容会被重置,所以这一步一定要慎重:bash1
npm i
执行以下命令情况并启动项目,进入
localhost:4000进行验证:bash1
hexo cl; hexo g; hexo s
当本地能成功启动,之后就可以部署到Github,执行以下代码:
bash1
hexo d
如果出现
Deploy done,则说明部署成功,稍等两分钟,打开浏览器访问之前的域名就可以看到之前的博客,以后你可以在这台新电脑上魔改和写文章了~
打赏按钮菜单(店长微调)
点击查看教程
参考教程:糖果屋微调合集
教程参考自店长的糖果屋微调集合,但是做完之后发现有些bug,悬浮鼠标显示的二维码是竖向的,于是做了一些调整,还有更换了一些旧的CDN等,可以放心食用。
修改
[BlogRoot]\themes\butterfly\layout\includes\post\reward.pug,整体替换为以下内容:plaintext1
2
3
4
5
6
7
8
9
10
11
12
13
14
15
16
17
18
19
20
21link(rel='stylesheet' href=url_for(theme.CDN.option.coin_css) media="defer" onload="this.media='all'")
.post-reward
button.tip-button.reward-button
span.tip-button__text= _p('donate')
.coin-wrapper
.coin
.coin__middle
.coin__back
.coin__front
.reward-main
ul.reward-all
each item in theme.reward.QR_code
- var clickTo = (item.itemlist||item).link ? (item.itemlist||item).link : (item.itemlist||item).img
li.reward-item
a(href=clickTo target='_blank')
img.post-qr-code-img(src=url_for((item.itemlist||item).img) alt=(item.itemlist||item).text)
.post-qr-code-desc=(item.itemlist||item).text
if theme.reward.coinAudio
- var coinAudio = theme.reward.coinAudio ? url_for(theme.reward.coinAudio) : 'https://cdn.cbd.int/akilar-candyassets@1.0.36/audio/coin.mp3'
audio#coinAudio(src=coinAudio)
script(defer src=url_for(theme.CDN.option.coin_js))新建
[BlogRoot]\themes\butterfly\source\css\coin.css,并写入如下代码:css1
2
3
4
5
6
7
8
9
10
11
12
13
14
15
16
17
18
19
20
21
22
23
24
25
26
27
28
29
30
31
32
33
34
35
36
37
38
39
40
41
42
43
44
45
46
47
48
49
50
51
52
53
54
55
56
57
58
59
60
61
62
63
64
65
66
67
68
69
70
71
72
73
74
75
76
77
78
79
80
81
82
83
84
85
86
87
88
89
90
91
92
93
94
95
96
97
98
99
100
101
102
103
104
105
106
107
108
109
110
111
112
113
114
115
116
117
118
119
120
121
122
123
124
125
126
127
128
129
130
131
132
133
134
135
136
137
138
139
140
141
142
143
144
145
146
147
148
149
150
151
152
153
154
155
156
157
158
159
160
161
162
163
164
165
166
167
168
169
170
171
172
173
174
175
176
177
178
179
180
181
182
183
184
185
186
187
188
189
190.tip-button {
border: 0;
border-radius: 0.25rem;
cursor: pointer;
font-size: 20px;
font-weight: 600;
height: 2.6rem;
margin-bottom: -4rem;
outline: 0;
position: relative;
top: 0;
transform-origin: 0% 100%;
transition: transform 50ms ease-in-out;
width: auto;
-webkit-tap-highlight-color: transparent;
}
.tip-button:active {
transform: rotate(4deg);
}
.tip-button.clicked {
animation: 150ms ease-in-out 1 shake;
pointer-events: none;
}
.tip-button.clicked .tip-button__text {
opacity: 0;
transition: opacity 100ms linear 200ms;
}
.tip-button.clicked::before {
height: 0.5rem;
width: 60%;
background: var(button-hover-color);
}
.tip-button.clicked .coin {
transition: margin-bottom 1s linear 200ms;
margin-bottom: 0;
}
.tip-button.shrink-landing::before {
transition: width 200ms ease-in;
width: 0;
}
.tip-button.coin-landed::after {
opacity: 1;
transform: scale(1);
transform-origin: 50% 100%;
}
.tip-button.coin-landed .coin-wrapper {
background: radial-gradient(circle at 35% 97%, rgba(3, 16, 50, 0.4) 0.04rem, transparent 0.04rem), radial-gradient(circle at 45% 92%, rgba(3, 16, 50, 0.4) 0.04rem, transparent 0.02rem), radial-gradient(circle at 55% 98%, rgba(3, 16, 50, 0.4) 0.04rem, transparent 0.04rem), radial-gradient(circle at 65% 96%, rgba(3, 16, 50, 0.4) 0.06rem, transparent 0.06rem);
background-position: center bottom;
background-size: 100%;
bottom: -1rem;
opacity: 0;
transform: scale(2) translateY(-10px);
}
.tip-button__text {
color: #fff;
margin-right: 1.8rem;
opacity: 1;
position: relative;
transition: opacity 100ms linear 500ms;
z-index: 3;
}
.tip-button::before {
border-radius: 0.25rem;
bottom: 0;
content: '';
display: block;
height: 100%;
left: 50%;
position: absolute;
transform: translateX(-50%);
transition: height 250ms ease-in-out 400ms, width 250ms ease-in-out 300ms;
width: 100%;
z-index: 2;
}
.tip-button::after {
bottom: -1rem;
color: white;
content: 'ヾ(≧O≦)〃嗷~'; /*点击后显示的内容*/
height: 110%;
left: 0;
opacity: 0;
position: absolute;
pointer-events: none;
text-align: center;
transform: scale(0);
transform-origin: 50% 20%;
transition: transform 200ms cubic-bezier(0, 0, 0.35, 1.43);
width: 100%;
z-index: 1;
}
.coin-wrapper {
background: none;
bottom: 0;
height: 18rem;
left: 0;
opacity: 1;
overflow: hidden;
pointer-events: none;
position: absolute;
transform: none;
transform-origin: 50% 100%;
transition: opacity 200ms linear 100ms, transform 300ms ease-out;
width: 100%;
}
.coin {
--front-y-multiplier: 0;
--back-y-multiplier: 0;
--coin-y-multiplier: 0;
--coin-x-multiplier: 0;
--coin-scale-multiplier: 0;
--coin-rotation-multiplier: 0;
--shine-opacity-multiplier: 0.4;
--shine-bg-multiplier: 50%;
bottom: calc(var(--coin-y-multiplier) * 1rem - 3.5rem);
height: 3.5rem;
margin-bottom: 3.05rem;
position: absolute;
right: calc(var(--coin-x-multiplier) * 34% + 16%);
transform: translateX(50%) scale(calc(0.4 + var(--coin-scale-multiplier))) rotate(calc(var(--coin-rotation-multiplier) * -1deg));
transition: opacity 100ms linear 200ms;
width: 3.5rem;
z-index: 3;
}
.coin__front, .coin__middle, .coin__back, .coin::before, .coin__front::after, .coin__back::after {
border-radius: 50%;
box-sizing: border-box;
height: 100%;
left: 0;
position: absolute;
width: 100%;
z-index: 3;
}
.coin__front {
background: radial-gradient(circle at 50% 50%, transparent 50%, rgba(115, 124, 153, 0.4) 54%, #c2cadf 54%), linear-gradient(210deg, #8590b3 32%, transparent 32%), linear-gradient(150deg, #8590b3 32%, transparent 32%), linear-gradient(to right, #8590b3 22%, transparent 22%, transparent 78%, #8590b3 78%), linear-gradient(to bottom, #fcfaf9 44%, transparent 44%, transparent 65%, #fcfaf9 65%, #fcfaf9 71%, #8590b3 71%), linear-gradient(to right, transparent 28%, #fcfaf9 28%, #fcfaf9 34%, #8590b3 34%, #8590b3 40%, #fcfaf9 40%, #fcfaf9 47%, #8590b3 47%, #8590b3 53%, #fcfaf9 53%, #fcfaf9 60%, #8590b3 60%, #8590b3 66%, #fcfaf9 66%, #fcfaf9 72%, transparent 72%);
background-color: #8590b3;
background-size: 100% 100%;
transform: translateY(calc(var(--front-y-multiplier) * 0.3181818182rem / 2)) scaleY(var(--front-scale-multiplier));
}
.coin__front::after {
background: rgba(0, 0, 0, 0.2);
content: '';
opacity: var(--front-y-multiplier);
}
.coin__middle {
background: #737c99;
transform: translateY(calc(var(--middle-y-multiplier) * 0.3181818182rem / 2)) scaleY(var(--middle-scale-multiplier));
}
.coin__back {
background: radial-gradient(circle at 50% 50%, transparent 50%, rgba(115, 124, 153, 0.4) 54%, #c2cadf 54%), radial-gradient(circle at 50% 40%, #fcfaf9 23%, transparent 23%), radial-gradient(circle at 50% 100%, #fcfaf9 35%, transparent 35%);
background-color: #8590b3;
background-size: 100% 100%;
transform: translateY(calc(var(--back-y-multiplier) * 0.3181818182rem / 2)) scaleY(var(--back-scale-multiplier));
}
.coin__back::after {
background: rgba(0, 0, 0, 0.2);
content: '';
opacity: var(--back-y-multiplier);
}
.coin::before {
background: radial-gradient(circle at 25% 65%, transparent 50%, rgba(255, 255, 255, 0.9) 90%), linear-gradient(55deg, transparent calc(var(--shine-bg-multiplier) + 0%), #e9f4ff calc(var(--shine-bg-multiplier) + 0%), transparent calc(var(--shine-bg-multiplier) + 50%));
content: '';
opacity: var(--shine-opacity-multiplier);
transform: translateY(calc(var(--middle-y-multiplier) * 0.3181818182rem / -2)) scaleY(var(--middle-scale-multiplier)) rotate(calc(var(--coin-rotation-multiplier) * 1deg));
z-index: 10;
}
.coin::after {
background: #737c99;
content: '';
height: 0.3181818182rem;
left: 0;
position: absolute;
top: 50%;
transform: translateY(-50%);
width: 100%;
z-index: 2;
}
@keyframes shake {
0% {
transform: rotate(4deg);
}
66% {
transform: rotate(-4deg);
}
100% {
transform: rotate();
}
}新建
[BlogRoot]\themes\butterfly\source\js\coin.js,并写入如下代码:js1
2
3
4
5
6
7
8
9
10
11
12
13
14
15
16
17
18
19
20
21
22
23
24
25
26
27
28
29
30
31
32
33
34
35
36
37
38
39
40
41
42
43
44
45
46
47
48
49
50
51
52
53
54
55
56
57
58
59
60
61
62
63
64
65
66
67
68
69
70
71
72
73
74
75
76
77
78
79
80
81
82
83
84
85
86
87
88
89
90var tipButtons = document.querySelectorAll('.tip-button')
function coinAudio() {
var coinAudio = document.getElementById("coinAudio");
if (coinAudio) {
coinAudio.play();//有音频时播放
}
}
// Loop through all buttons (allows for multiple buttons on page)
tipButtons.forEach((button) => {
var coin = button.querySelector('.coin')
// The larger the number, the slower the animation
coin.maxMoveLoopCount = 90
button.addEventListener('click', () => {
if (/Android|webOS|BlackBerry/i.test(navigator.userAgent)) return true; //媒体选择
if (button.clicked) return
button.classList.add('clicked')
// Wait to start flipping th coin because of the button tilt animation
setTimeout(() => {
// Randomize the flipping speeds just for fun
coin.sideRotationCount = Math.floor(Math.random() * 5) * 90
coin.maxFlipAngle = (Math.floor(Math.random() * 4) + 3) * Math.PI
button.clicked = true
flipCoin()
coinAudio()
}, 50)
})
var flipCoin = () => {
coin.moveLoopCount = 0
flipCoinLoop()
}
var resetCoin = () => {
coin.style.setProperty('--coin-x-multiplier', 0)
coin.style.setProperty('--coin-scale-multiplier', 0)
coin.style.setProperty('--coin-rotation-multiplier', 0)
coin.style.setProperty('--shine-opacity-multiplier', 0.4)
coin.style.setProperty('--shine-bg-multiplier', '50%')
coin.style.setProperty('opacity', 1)
// Delay to give the reset animation some time before you can click again
setTimeout(() => {
button.clicked = false
}, 300)
}
var flipCoinLoop = () => {
coin.moveLoopCount++
var percentageCompleted = coin.moveLoopCount / coin.maxMoveLoopCount
coin.angle = -coin.maxFlipAngle * Math.pow((percentageCompleted - 1), 2) + coin.maxFlipAngle
// Calculate the scale and position of the coin moving through the air
coin.style.setProperty('--coin-y-multiplier', -11 * Math.pow(percentageCompleted * 2 - 1, 4) + 11)
coin.style.setProperty('--coin-x-multiplier', percentageCompleted)
coin.style.setProperty('--coin-scale-multiplier', percentageCompleted * 0.6)
coin.style.setProperty('--coin-rotation-multiplier', percentageCompleted * coin.sideRotationCount)
// Calculate the scale and position values for the different coin faces
// The math uses sin/cos wave functions to similate the circular motion of 3D spin
coin.style.setProperty('--front-scale-multiplier', Math.max(Math.cos(coin.angle), 0))
coin.style.setProperty('--front-y-multiplier', Math.sin(coin.angle))
coin.style.setProperty('--middle-scale-multiplier', Math.abs(Math.cos(coin.angle), 0))
coin.style.setProperty('--middle-y-multiplier', Math.cos((coin.angle + Math.PI / 2) % Math.PI))
coin.style.setProperty('--back-scale-multiplier', Math.max(Math.cos(coin.angle - Math.PI), 0))
coin.style.setProperty('--back-y-multiplier', Math.sin(coin.angle - Math.PI))
coin.style.setProperty('--shine-opacity-multiplier', 4 * Math.sin((coin.angle + Math.PI / 2) % Math.PI) - 3.2)
coin.style.setProperty('--shine-bg-multiplier', -40 * (Math.cos((coin.angle + Math.PI / 2) % Math.PI) - 0.5) + '%')
// Repeat animation loop
if (coin.moveLoopCount < coin.maxMoveLoopCount) {
if (coin.moveLoopCount === coin.maxMoveLoopCount - 6) button.classList.add('shrink-landing')
window.requestAnimationFrame(flipCoinLoop)
} else {
button.classList.add('coin-landed')
coin.style.setProperty('opacity', 0)
setTimeout(() => {
button.classList.remove('clicked', 'shrink-landing', 'coin-landed')
setTimeout(() => {
resetCoin()
}, 300)
}, 1500)
}
}
})修改主题配置文件
_config.butterfly.yml,添加音频文件配置项以及CDN配置项:diff1
2
3
4
5
6
7
8
9
10
11
12
13
14
15# Sponsor/reward
reward:
enable: true
+ coinAudio: https://npm.elemecdn.com/akilar-candyassets@1.0.36/audio/aowu.m4a
QR_code:
...
CDN:
# main
main_css: /css/index.css
jquery: https://npm.elemecdn.com/jquery@latest/dist/jquery.min.js
main: /js/main.js
utils:/js/utils.js
+ # 打赏按钮投币效果
+ coin_js: /js/coin.js
+ coin_css: /css/coin.css修改
[BlogRoot]\themes\butterfly\source\css\_layout\reward.styl,整体替换为以下内容:stylus1
2
3
4
5
6
7
8
9
10
11
12
13
14
15
16
17
18
19
20
21
22
23
24
25
26
27
28
29
30
31
32
33
34
35
36
37
38
39
40
41
42
43
44
45
46
47
48
49
50
51
52
53
54
55
56
57
58
59
60
61
62
63
64
65
66
67
68
69
70
71.post-reward
position: relative
margin-top: 3rem
width: 100%
text-align: center
.reward-button
display: inline-block
padding: .2rem 1.2rem
background: var(--btn-bg)
color: var(--btn-color)
transition: all .4s
border-radius: 30px
&:hover
box-shadow: inset 20em 0 0 0 var(--btn-hover-color)
.reward-main
display: flex
.reward-main
position: absolute
bottom: 40px
left: -55%
z-index: 100
display: none
padding: 0 0 15px
width: 150%
.reward-all
display: flex
margin: 0
padding: 1rem .5rem
border-radius: 12px
background: var(--reward-pop)
&:before
position: absolute
bottom: -10px
left: 0
width: 100%
height: 20px
content: ''
&:after
position: absolute
right: 0
bottom: 2px
left: 0
margin: 0 auto
width: 0
height: 0
border-top: 13px solid var(--reward-pop)
border-right: 13px solid transparent
border-left: 13px solid transparent
content: ''
.reward-item
display: inline-block
padding: 0 8px
list-style-type: none
vertical-align: top
img
width: 130px
height: 130px
.post-qr-code-desc
padding-top: .4rem
width: 130px
color: $reward-pop-up-color到这里基本就完成了,这里需要微调的是步骤5中的第16、24和28行,根据自己的二维码宽度进行调节,然后重启项目:
bash1
hexo cl; hexo s
gulp压缩全局资源(店长)
点击查看教程
参考教程:使用gulp压缩博客静态资源
Github Action自动部署(店长)
点击查看教程
新版Aplayer(安知鱼)
点击查看教程
参考教程:butterfly魔改aplayer音乐
首页飞只因(tzy)
点击查看教程
参考教程:飞只因太美,给你的首页装上吧!
Hexo + Butterfly 一些常见问题(tzy)
点击查看教程
Vercel被墙导致Twikoo评论失败的解决方案(tzy)
点击查看教程
Algolia搜索系统
点击查看教程
当网站数据多了,建议用搜索系统,会使得网站加载速度更快!
参考教程:
搜索显示内容一定要装 hexo-algoliasearch,并且卸载 hexo-algolia,两者会冲突,还要指定一个插件项:
1 | # 新版的搜索插件 |
🍕🍕🍕写在最后
大家有啥教程想看的可以在评论区留言,如果搭建或者魔改过程中遇到不懂的可以加下面的群讨论,同时本人在B站有空也会做一些魔改系列的视频教程,点这里可以进入我的B站账号个人空间–Fomalhaut